
Settings
Under Account settings you set how your emails look and where they’re sent from, what Echo asks when people subscribe and unsubscribe, and which notifications your team gets.
The settings menu
Section titled “The settings menu”Click Account settings in the left menu. The left menu is replaced by the settings menu, with a Back to Dashboard link at the top.
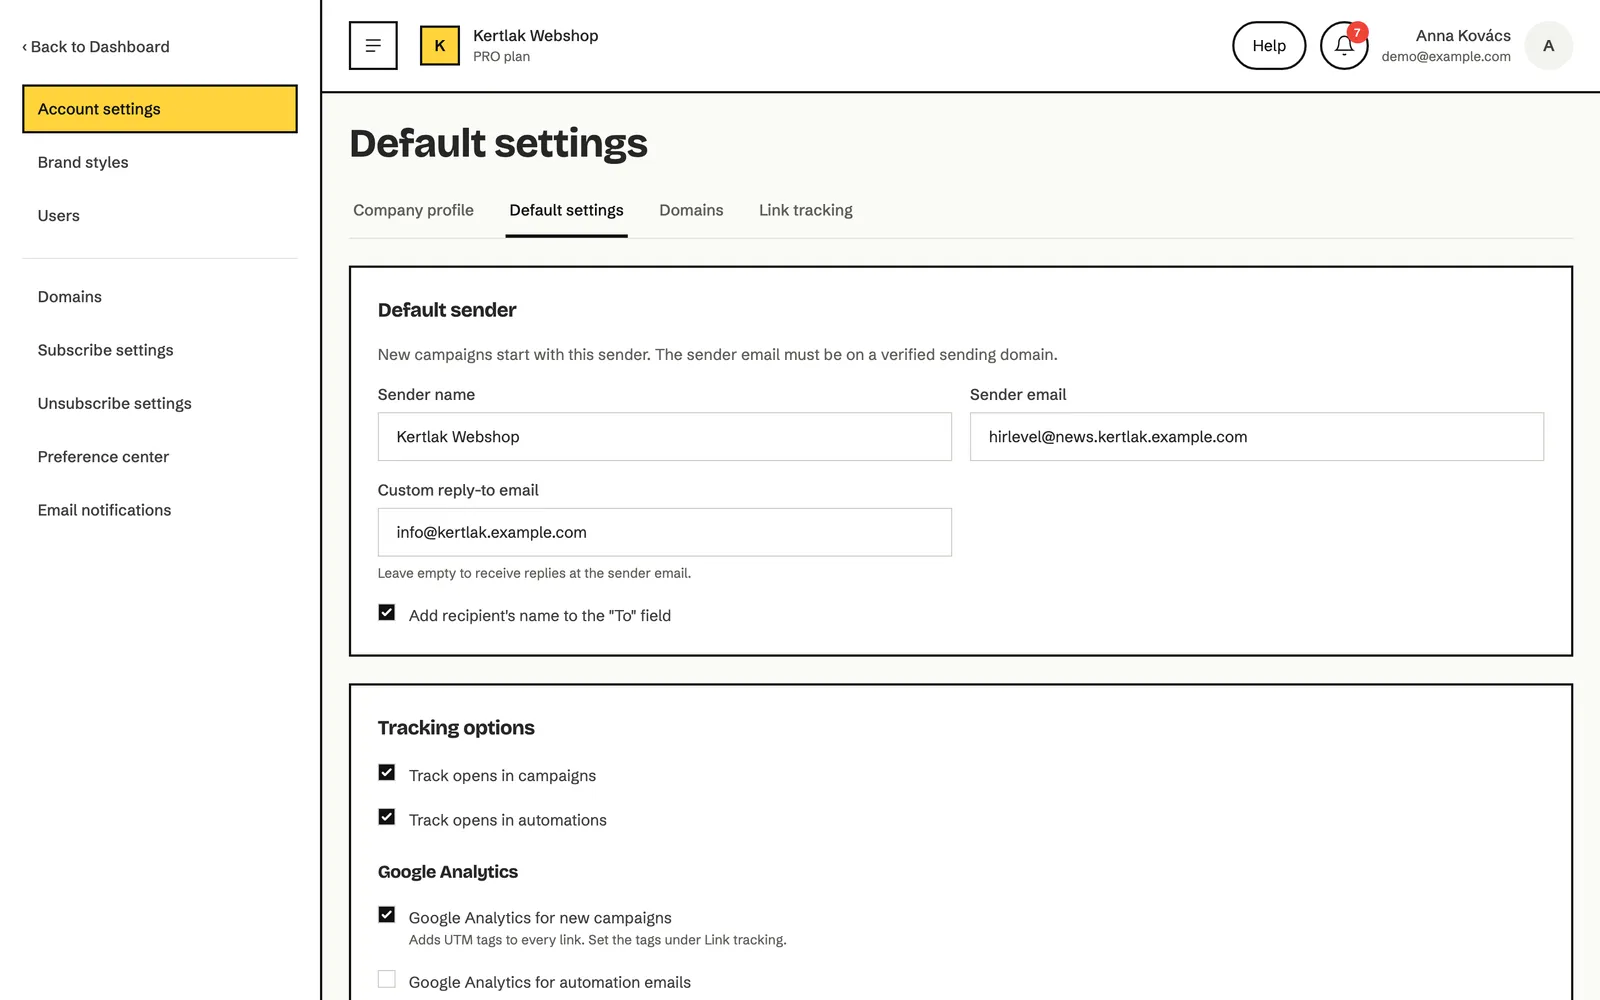
| Menu item | What you set there |
|---|---|
| Account settings | Four tabs: Company profile, Default settings, Domains and Link tracking. The Company profile tab is covered in the Getting started chapter. |
| Brand styles | Your logo, colours, font, social links and the footer new emails start with. |
| Users | Team members, roles and invitations, covered in the Getting started chapter. |
| Domains | Your sending domains and the tracking domain. It’s the same page as the Domains tab under Account settings. |
| Subscribe settings | Double opt-in and the confirmation email. |
| Unsubscribe settings | The unsubscribe page, the reasons offered and the unsubscribe statistics. |
| Preference center | The page where subscribers choose their groups themselves. |
| Email notifications | Which emails your team gets about the workspace, and who gets them. |
How to set the default sender and tracking
Section titled “How to set the default sender and tracking”New campaigns start with these settings. You can change any of them in a single campaign later.
- Click Account settings, then the Default settings tab.
- In the Default sender part, fill in Sender name and Sender email. The address must be on a verified sending domain.
- To receive replies at another address, fill in Custom reply-to email. Left empty, replies go to the sender email.
- If you tick Add recipient’s name to the “To” field, the recipient field of the email shows the subscriber’s name, not only their address.
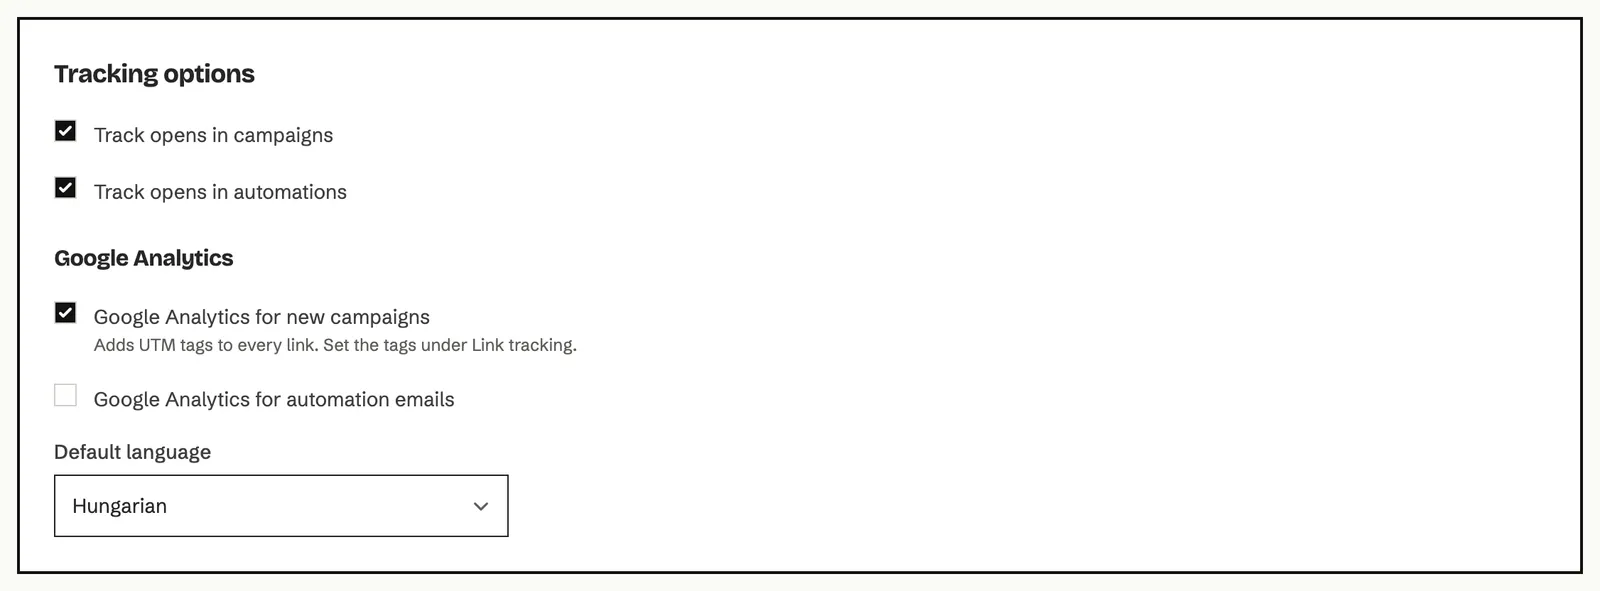
- In the Tracking options part, decide whether Echo tracks opens in campaigns and in automations.
- In the Google Analytics part, turn it on if you want UTM tags on the links in your emails. You set the tags themselves on the Link tracking tab.
- In the Default language list, choose the workspace’s default language: English or Hungarian.
- Click Save changes.
How to set your company details and footer texts
Section titled “How to set your company details and footer texts”The footer of your emails shows your company details and the unsubscribe link, as anti-spam laws require. You set them at the bottom of the Default settings tab, in the Company details and unsubscribe disclaimer part.
- Fill in Company name, Address, City, ZIP code and Country. The same details show on the Company profile tab.
- Keep Add the footer automatically when an email has no unsubscribe link ticked. This way no email goes out without a way to unsubscribe.
- For your own wording, fill in Unsubscribe disclaimer, Unsubscribe link text and Preference center link text.
- If you send in both English and Hungarian, set separate texts per language in the English texts and Hungarian texts boxes.
- Click Save changes.
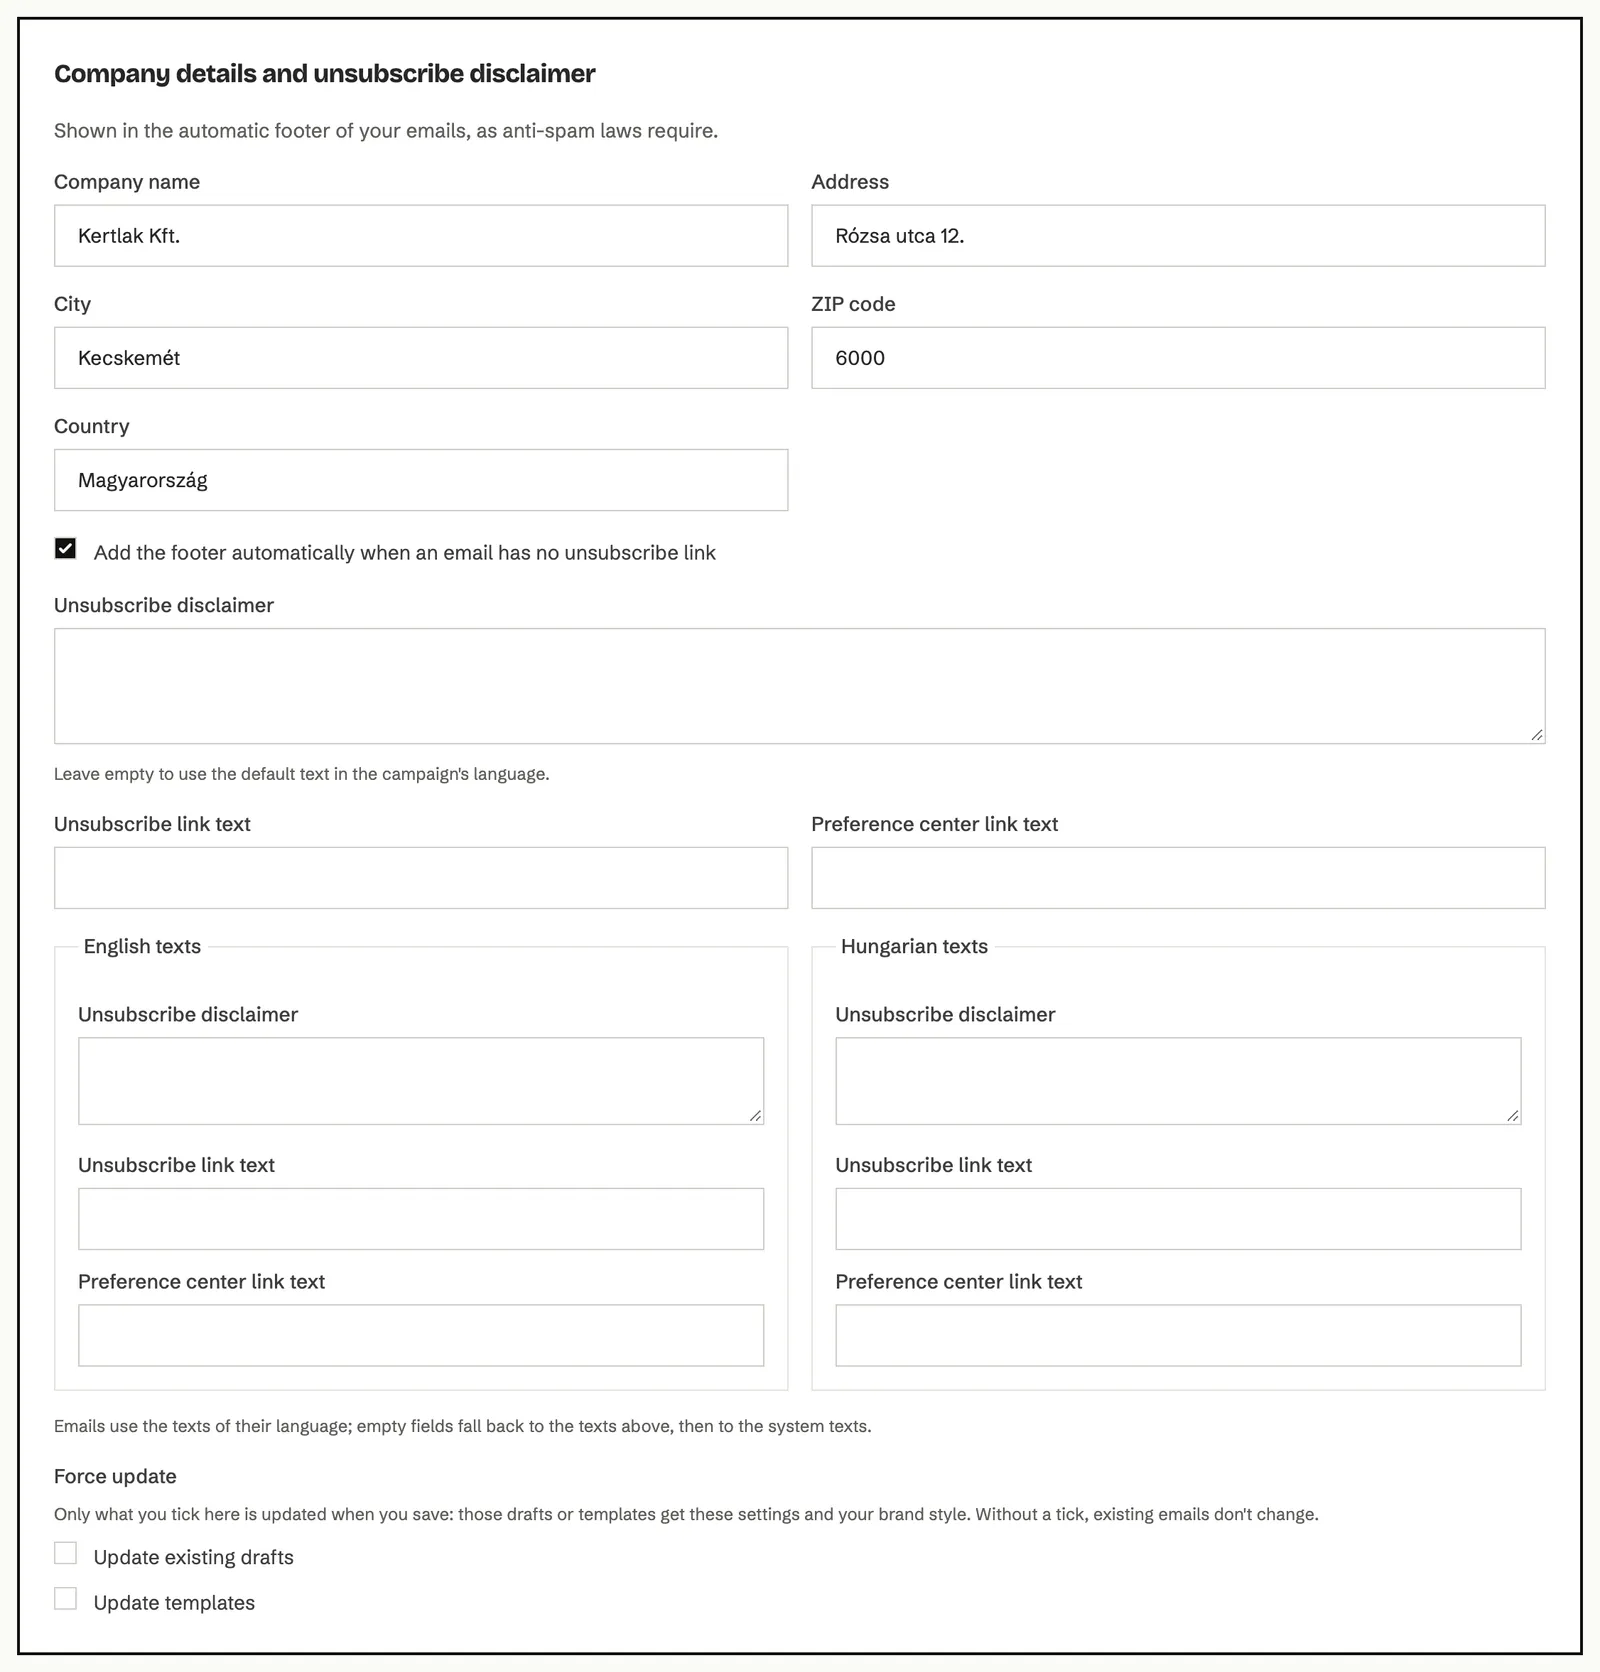
Each email uses the texts of its own language. An empty field falls back to the general text above, and if that’s empty too, to Echo’s built-in text.
Force update
New settings apply to new emails only. To update your existing drafts or templates as well, tick Update existing drafts or Update templates before saving. After the save, those emails get the new settings and your brand style, and you see Existing drafts and templates will be updated in a moment.
How to set up your brand styles
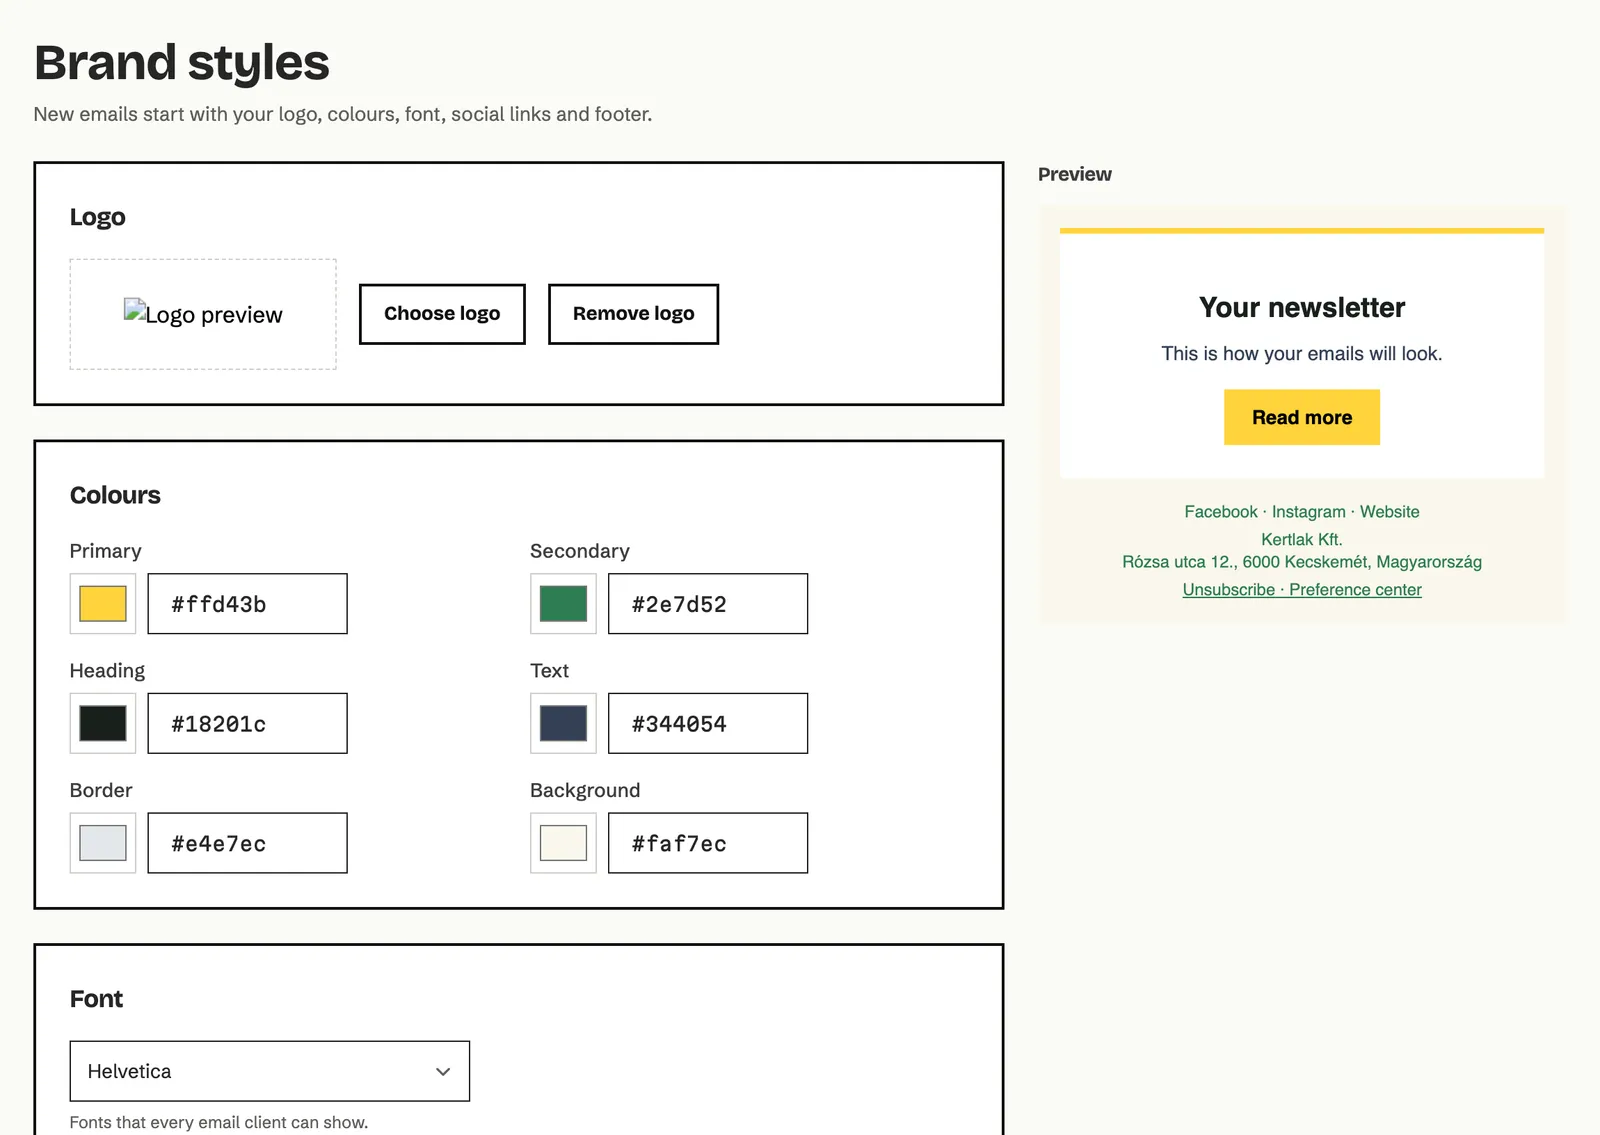
Section titled “How to set up your brand styles”With brand styles, new emails start with your logo, colours, font, social links and footer. The Preview on the right shows how they’ll look, with your saved company details in the footer.
- Click Brand styles in the settings menu.
- In the Logo part, click Choose logo and pick an image from your files. Remove logo takes it off.
- In the Colours part, set the Primary, Secondary, Heading, Text, Border and Background colours. Click a swatch for the colour picker, or type the code as #RRGGBB, for example #465FFF.
- Choose a font in the Font list. It only offers fonts that every email client can show.
- In the Social links part, add a link with Add social link, choose the network in the Network list and enter the full address in Link.
- In the Footer part, choose the footer layout.
- Click Save changes.
Button colours
The Primary colour is the background of the buttons in your emails and the colour of the links. Echo picks the button text colour by itself: black or white, whichever is easier to read on the primary colour. On a light yellow button the text is black, on a dark blue one it’s white. If you give a button its own text colour in the editor, that one is used.
Footer layouts
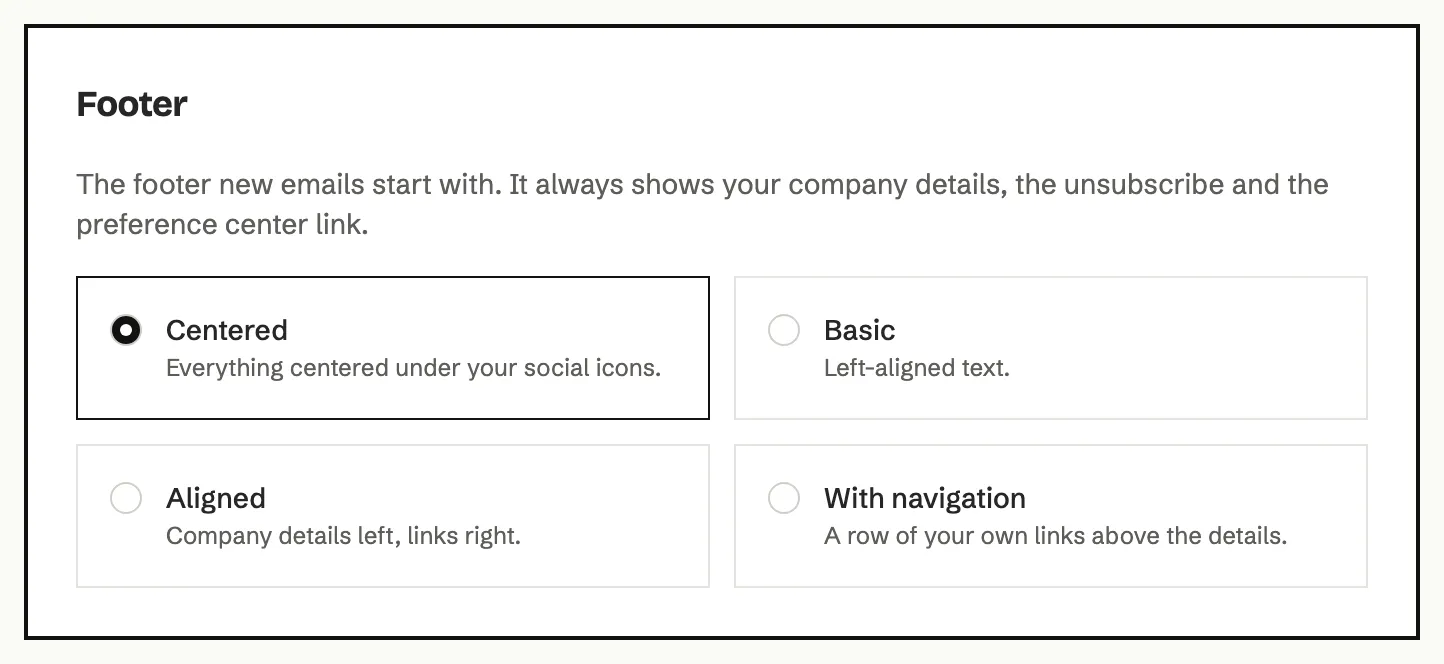
| Layout | What it looks like |
|---|---|
| Centered | Everything centered under your social icons. |
| Basic | Left-aligned text. |
| Aligned | Company details on the left, links on the right. |
| With navigation | A row of your own links above the details. |
How to add and verify a sending domain
Section titled “How to add and verify a sending domain”Campaigns can only be sent from a verified domain. Verification shows mailbox providers that your emails really come from you, so they land in the inbox and not in spam. The domain is the part of the sender address after the @: in [email protected] it’s news.kertlak.example.com.
-
Click Domains in the settings menu.
-
Click Add domain.
-
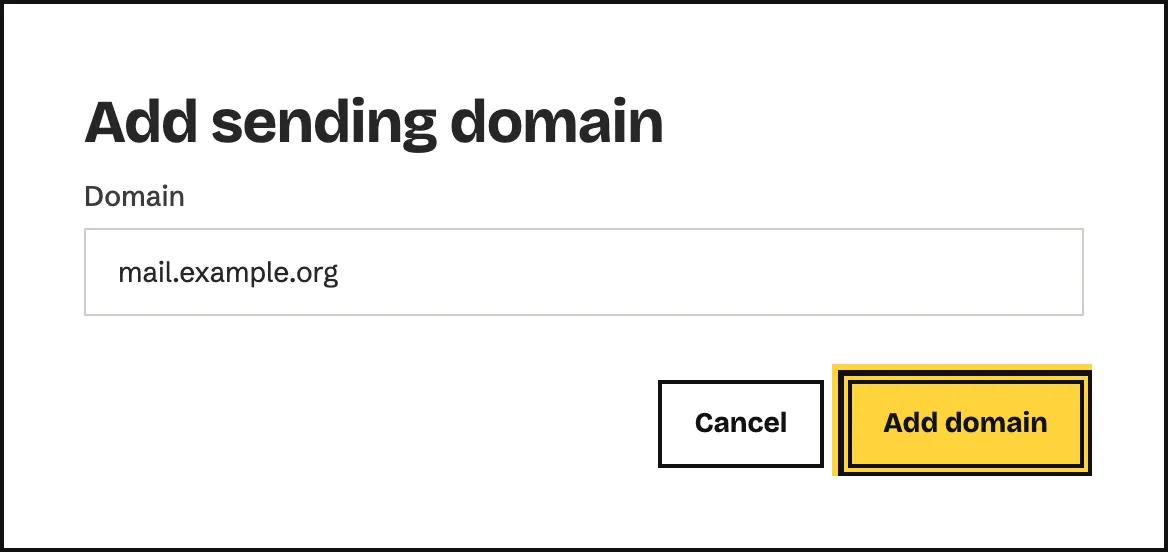
Enter the domain in the Domain field and click Add domain.
-
The DNS records for … window opens. Add the records shown there at your DNS provider, where you manage your domain. Every name and value has a copy button next to it, so you don’t have to type them.
-
Once you’ve added the records, click Check now.
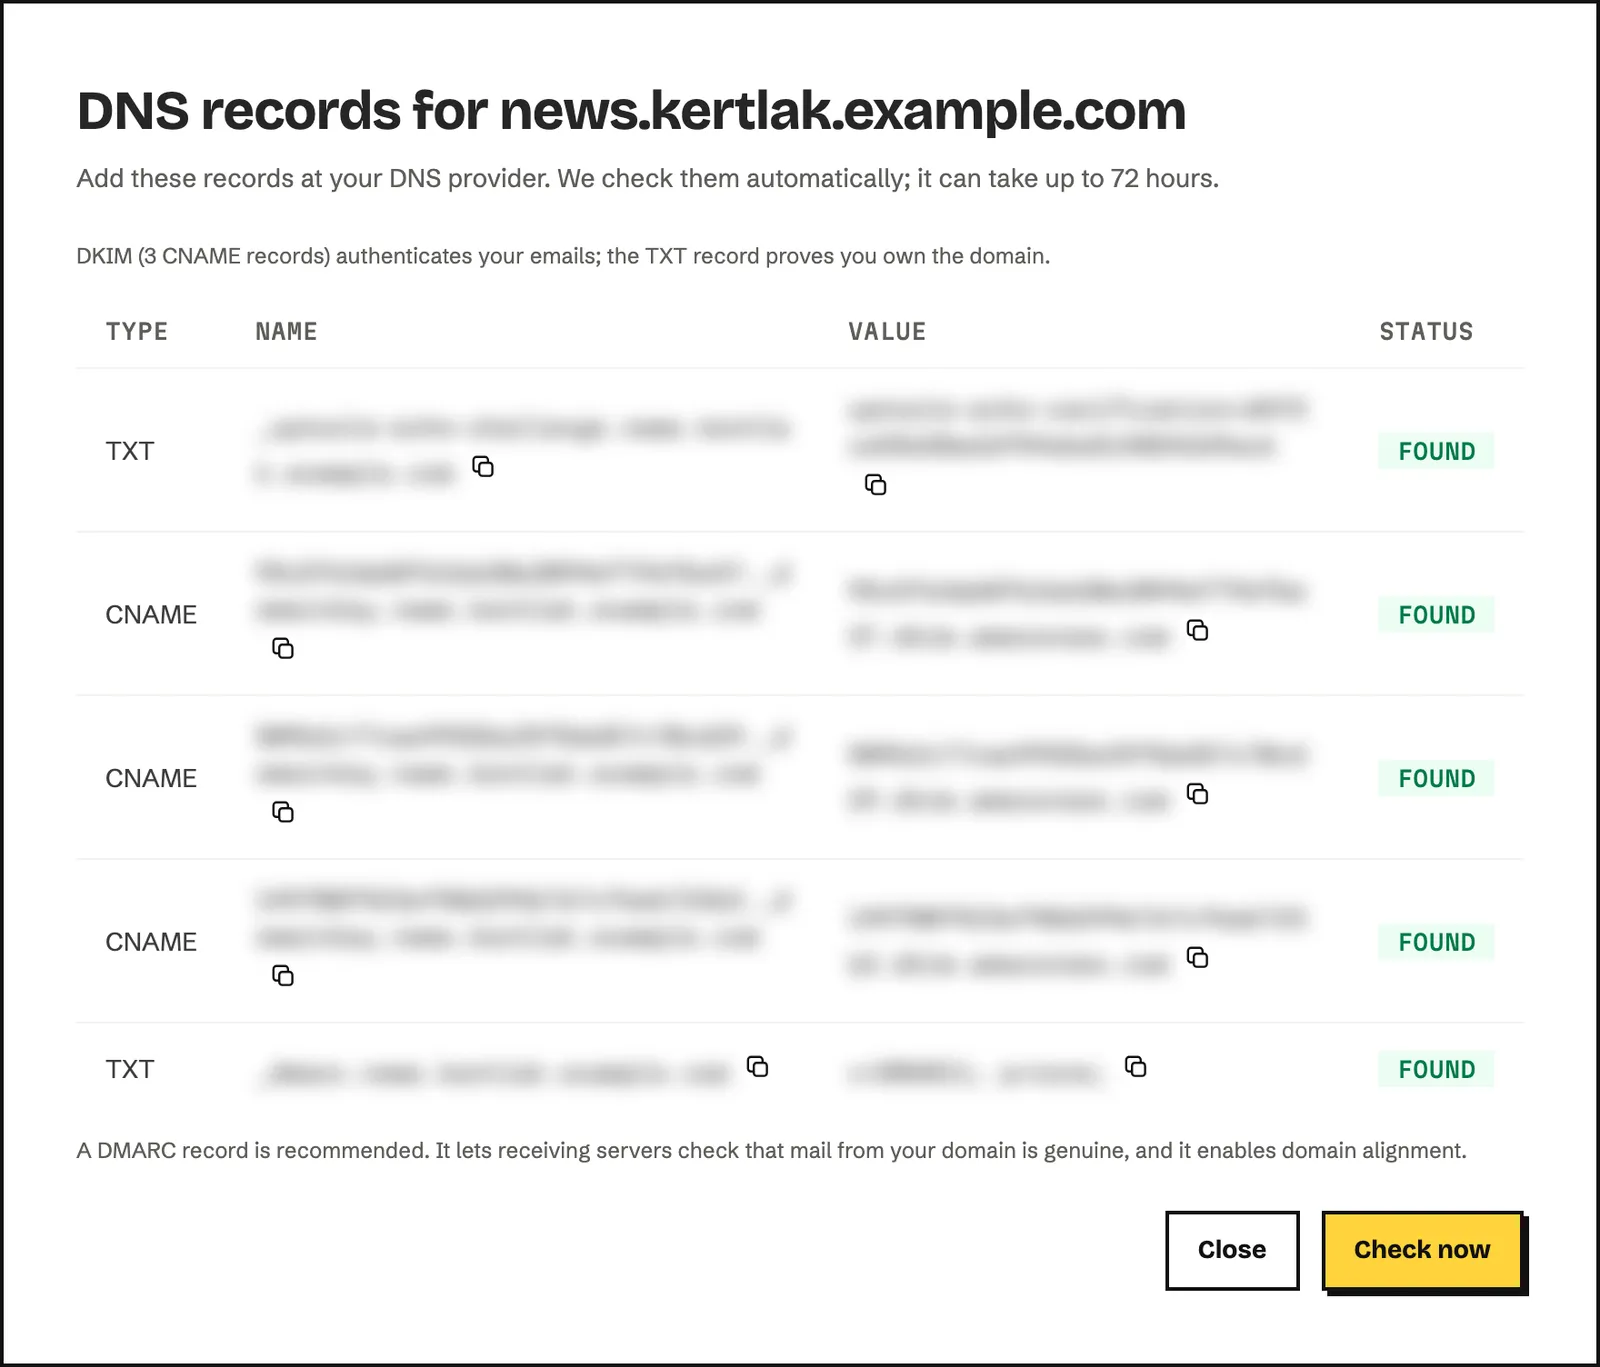
| Record | What it’s for |
|---|---|
TXT (the first row, name starting with _uptools-echo-challenge) |
Proves that you own the domain. Its value starts with uptools-echo-verification=. |
| CNAME (three rows) | DKIM authentication: Echo signs your emails on behalf of your domain with these. |
TXT (name starting with _dmarc) |
The DMARC record. It isn’t required, but recommended: receiving mail servers use it to check that mail from your domain is genuine. |
The Status column shows for each record whether Echo has found it (Found) or not yet (Not found yet). Until the DMARC record exists, it shows Recommended.
Sending domain statuses
Section titled “Sending domain statuses”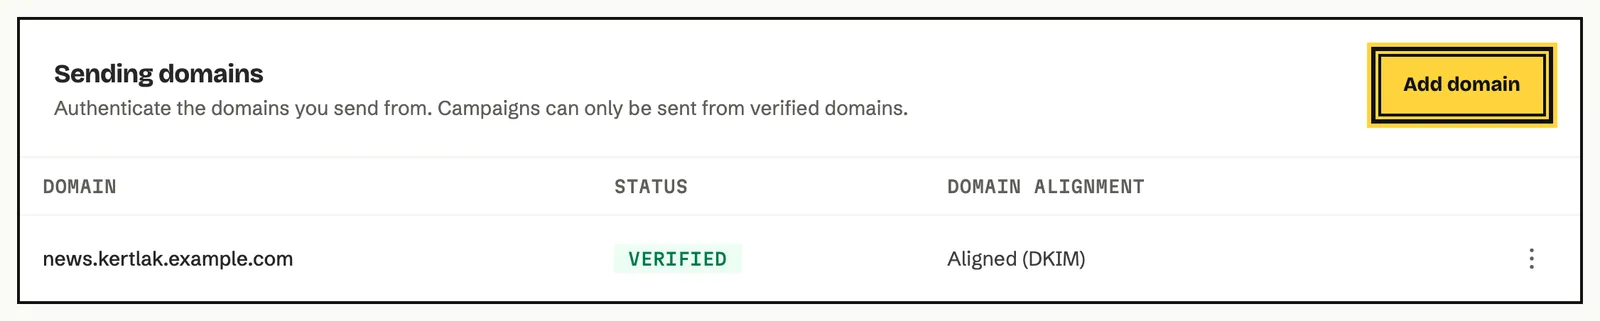
| Status | What it means |
|---|---|
| Pending | Echo hasn’t found all required records yet. You can’t send from this domain yet. |
| Verified | All required records are in place, and you can send from this domain. |
| Failed | Verification didn’t succeed: the domain wasn’t verified within 72 hours, the DKIM check reported an error, or another account has already verified it. Check in the DNS records window which record is missing, fix it and click Check now. |
The Domain alignment column is about DMARC. Aligned (DKIM): the DMARC record exists and the DKIM signature matches your domain, which is the best state. Not aligned: the DMARC record exists, but the signature doesn’t match. No DMARC record: add the DMARC record.
How to set up a tracking domain
Section titled “How to set up a tracking domain”The links in your emails, the image that measures opens and the unsubscribe page use Echo’s own tracking domain by default. If you want those links to show your own domain too, set up a tracking domain.
- On the Domains page, scroll to the Tracking domain part.
- In the Tracking domain field, enter a subdomain of one of your verified sending domains, for example links.example.com.
- At your DNS provider, create a CNAME record for this subdomain. Where it must point is written in the text of the Tracking domain part.
- Click Save tracking domain.
- Once the CNAME record is live, click Check now.
How to set up link tracking
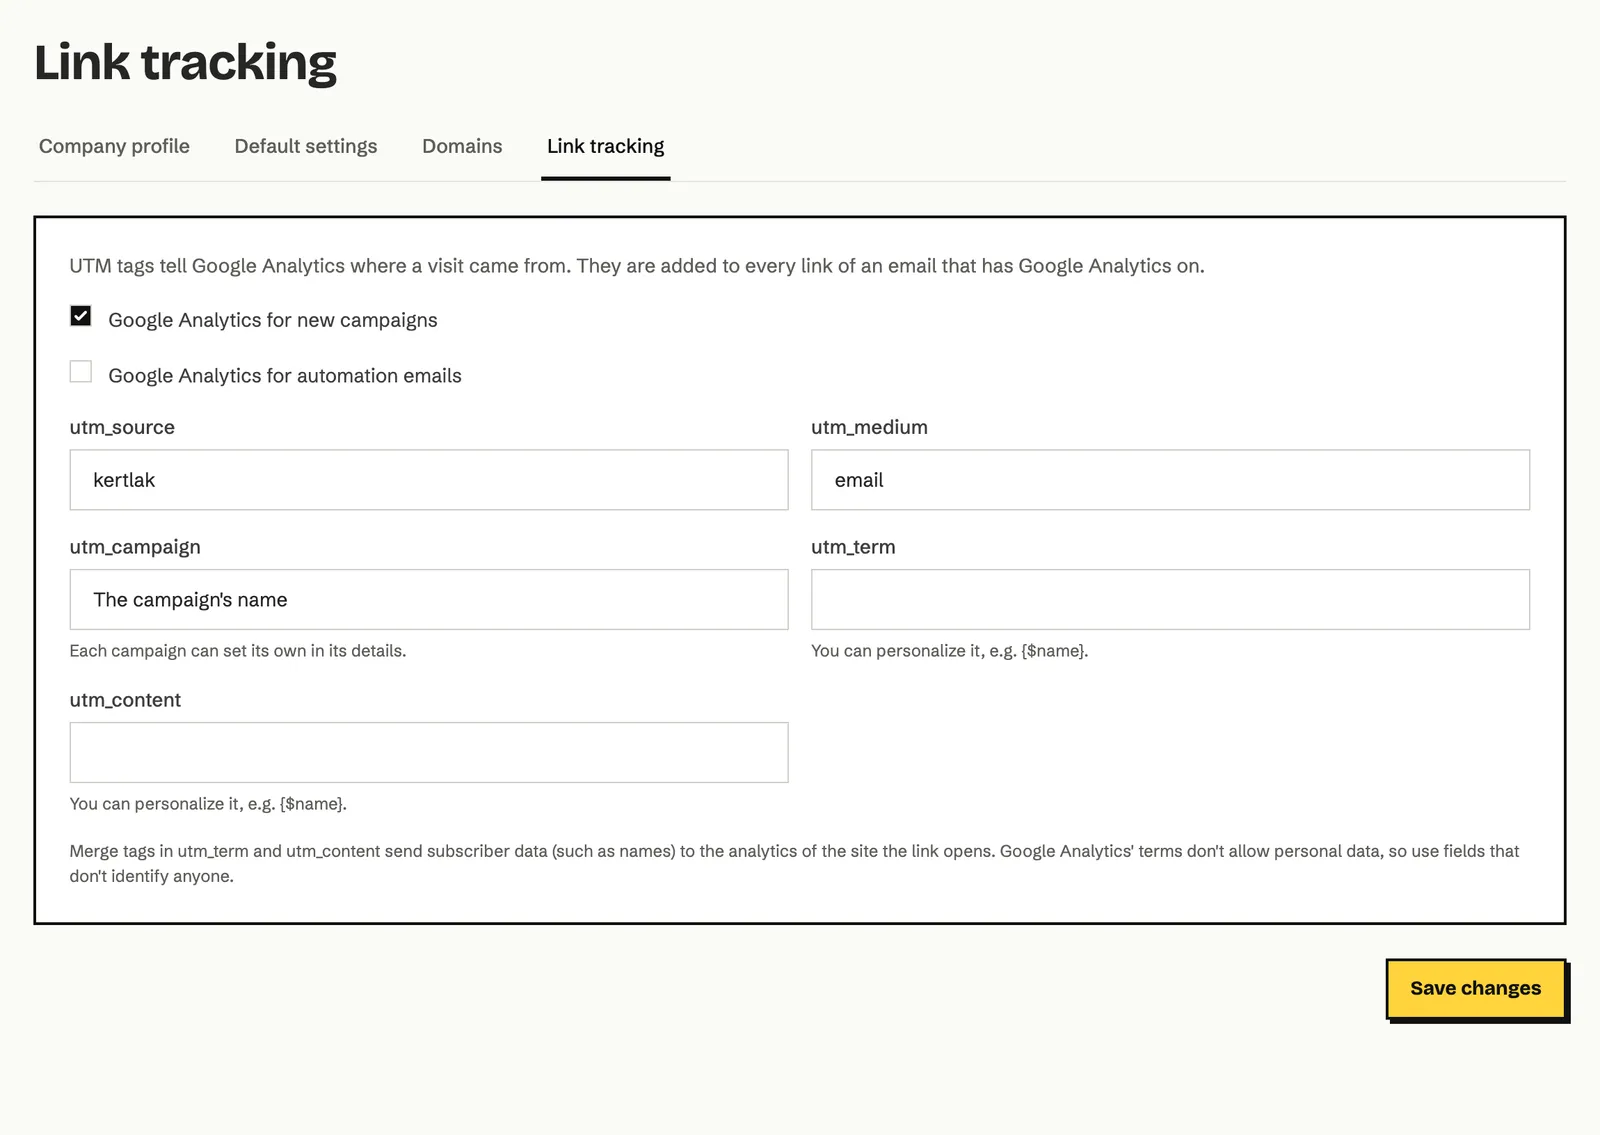
Section titled “How to set up link tracking”UTM tags tell Google Analytics that a visitor came from your email. Echo adds the tags to the links of every email that has Google Analytics on.
- Click Account settings, then the Link tracking tab.
- Tick Google Analytics for new campaigns and, if you want it, Google Analytics for automation emails.
- Set utm_source (for example your shop’s name) and utm_medium (for example email).
- utm_campaign is always the campaign’s name. A campaign can override it in its own details.
- If you want, fill in utm_term and utm_content. You can use merge tags in them, for example
{$name}. - Click Save changes.
How to turn on double opt-in
Section titled “How to turn on double opt-in”With double opt-in, a new subscriber gets a confirmation email and only becomes active after clicking its button. This way you know the address exists and its owner really wants your emails.
- Click Subscribe settings in the settings menu.
- Tick Double opt-in for API and integrations.
- In the Confirmation email part, set the email’s Subject, Sender name, Sender email, Heading, Message and Button text. Empty fields use the default text.
- In the Thank-you page part, you can enter your own page in Redirect to this page after confirming. Left empty, the built-in confirmation page shows.
- Click Save changes.
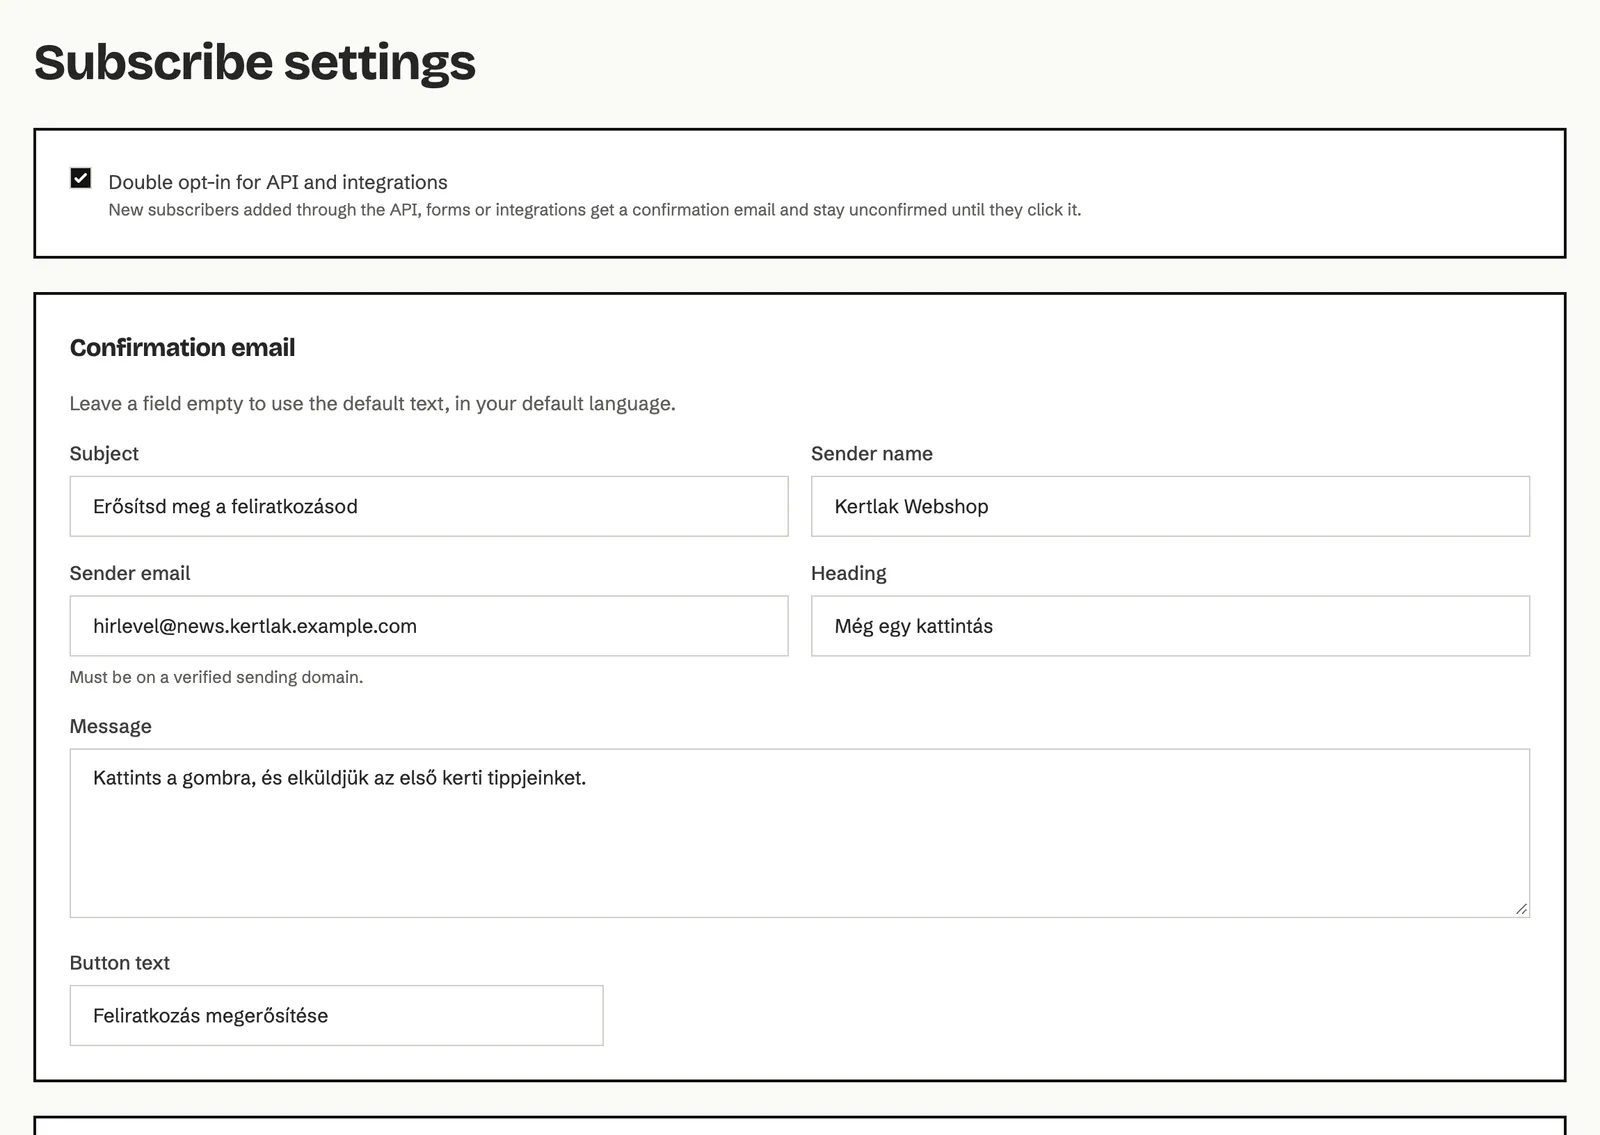
Double opt-in applies to new subscribers who come in through the API, a form or an integration. Until they click, they’re Unconfirmed and don’t get campaigns.
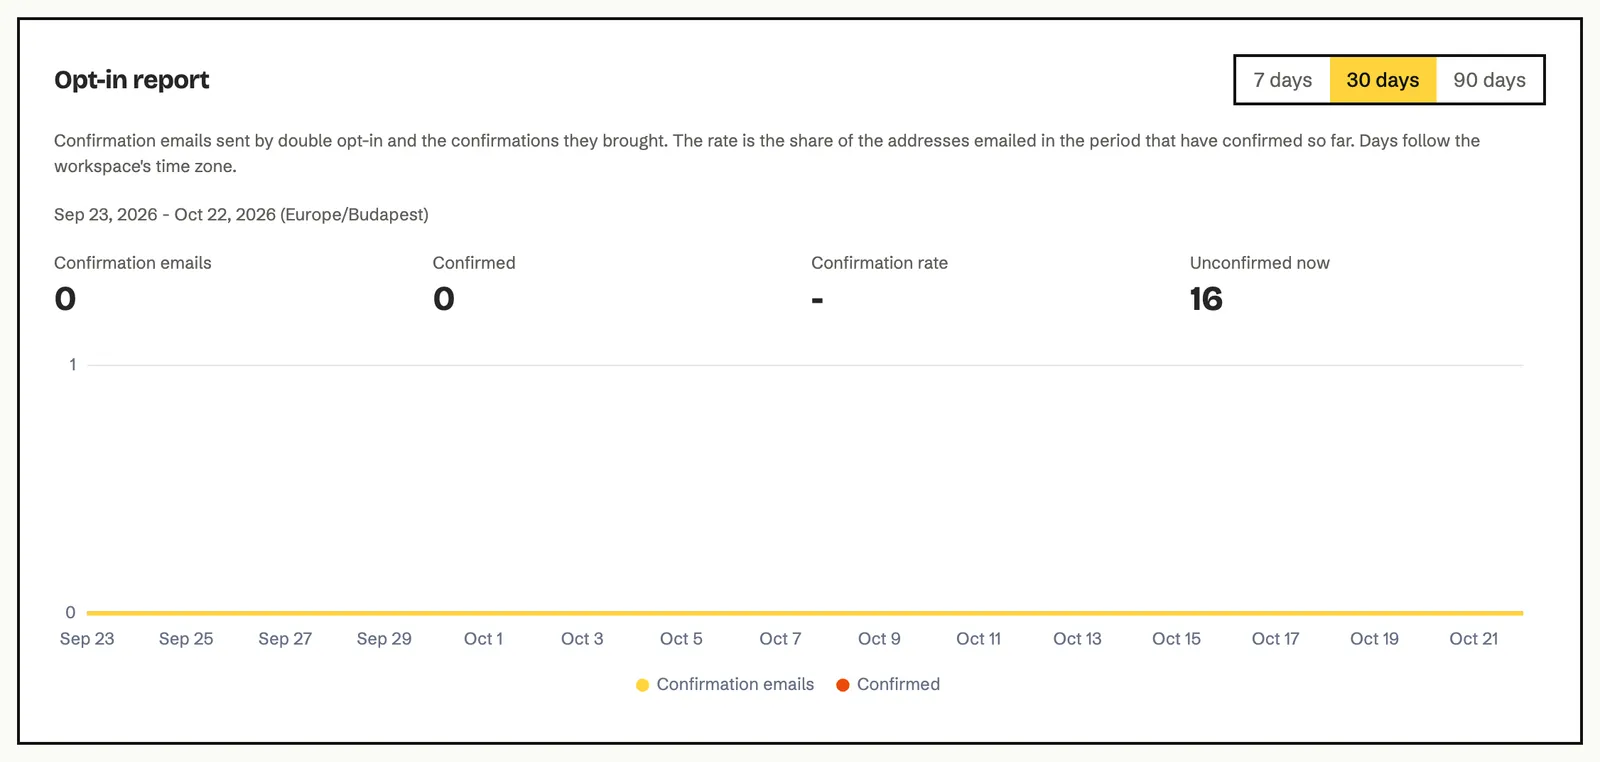
The Opt-in report
At the bottom of the page, the Opt-in report shows how many confirmation emails went out (Confirmation emails), how many people confirmed (Confirmed), the Confirmation rate, and how many subscribers are waiting to confirm right now (Unconfirmed now). Pick the period with 7 days, 30 days and 90 days at the top.
How to set up the unsubscribe page
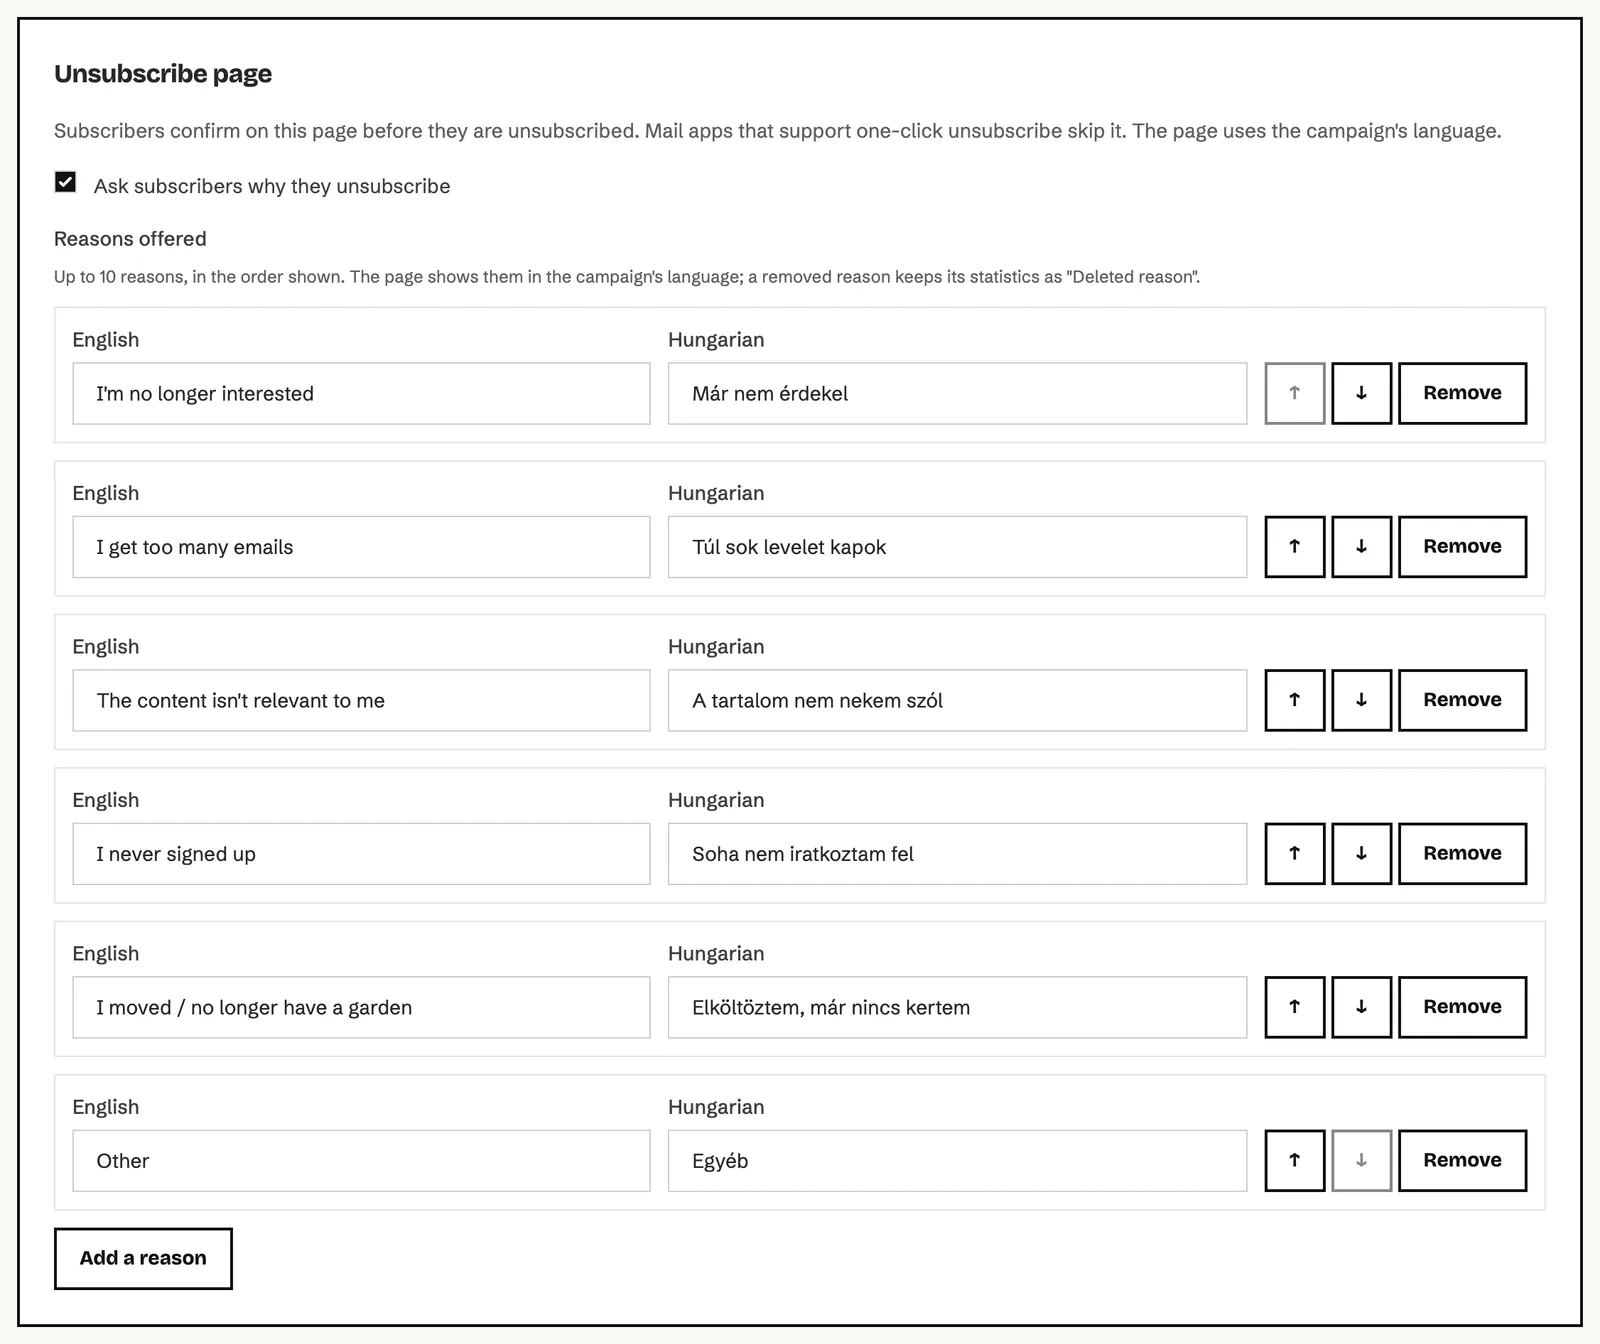
Section titled “How to set up the unsubscribe page”When someone clicks the unsubscribe link at the bottom of an email, they land on the unsubscribe page and confirm there. The page uses the campaign’s language.
- Click Unsubscribe settings in the settings menu.
- To learn why people unsubscribe, tick Ask subscribers why they unsubscribe.
- In Reasons offered, give each reason in English and Hungarian. Reorder them with the arrows, take one out with Remove, and add one with Add a reason.
- In the Page texts part, change the page’s title, text, button and the text shown after unsubscribing in the English page and Hungarian page boxes. Empty fields use the default text.
- Click Save changes.
Unsubscribe statistics
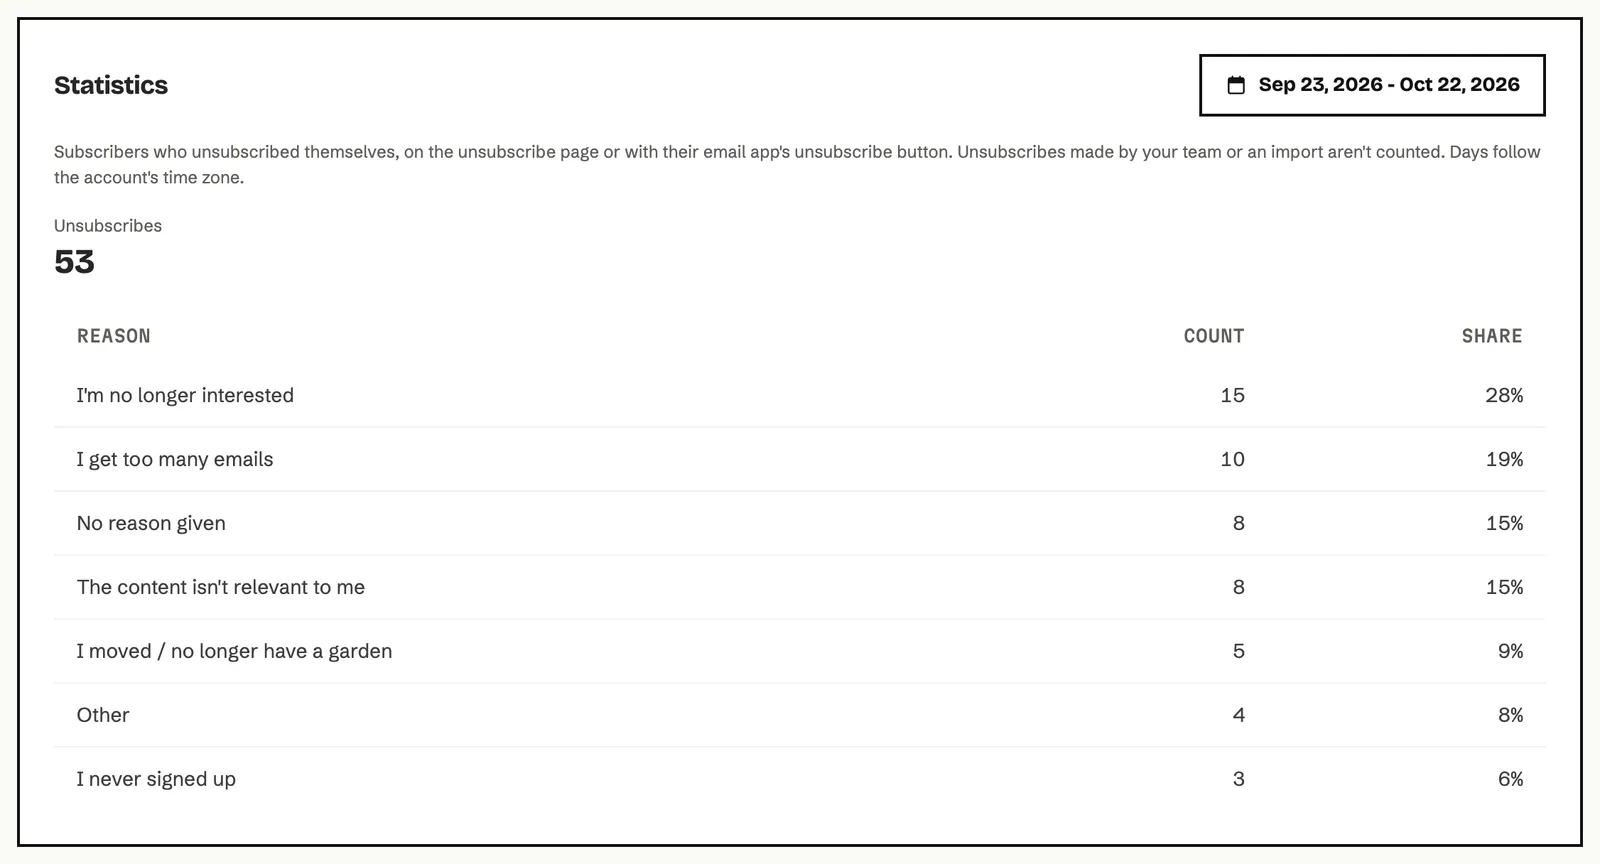
At the bottom of the page, the Statistics card shows how many people unsubscribed in the chosen period and how many picked each reason. Set the period in the top right corner.
How to turn on the preference center
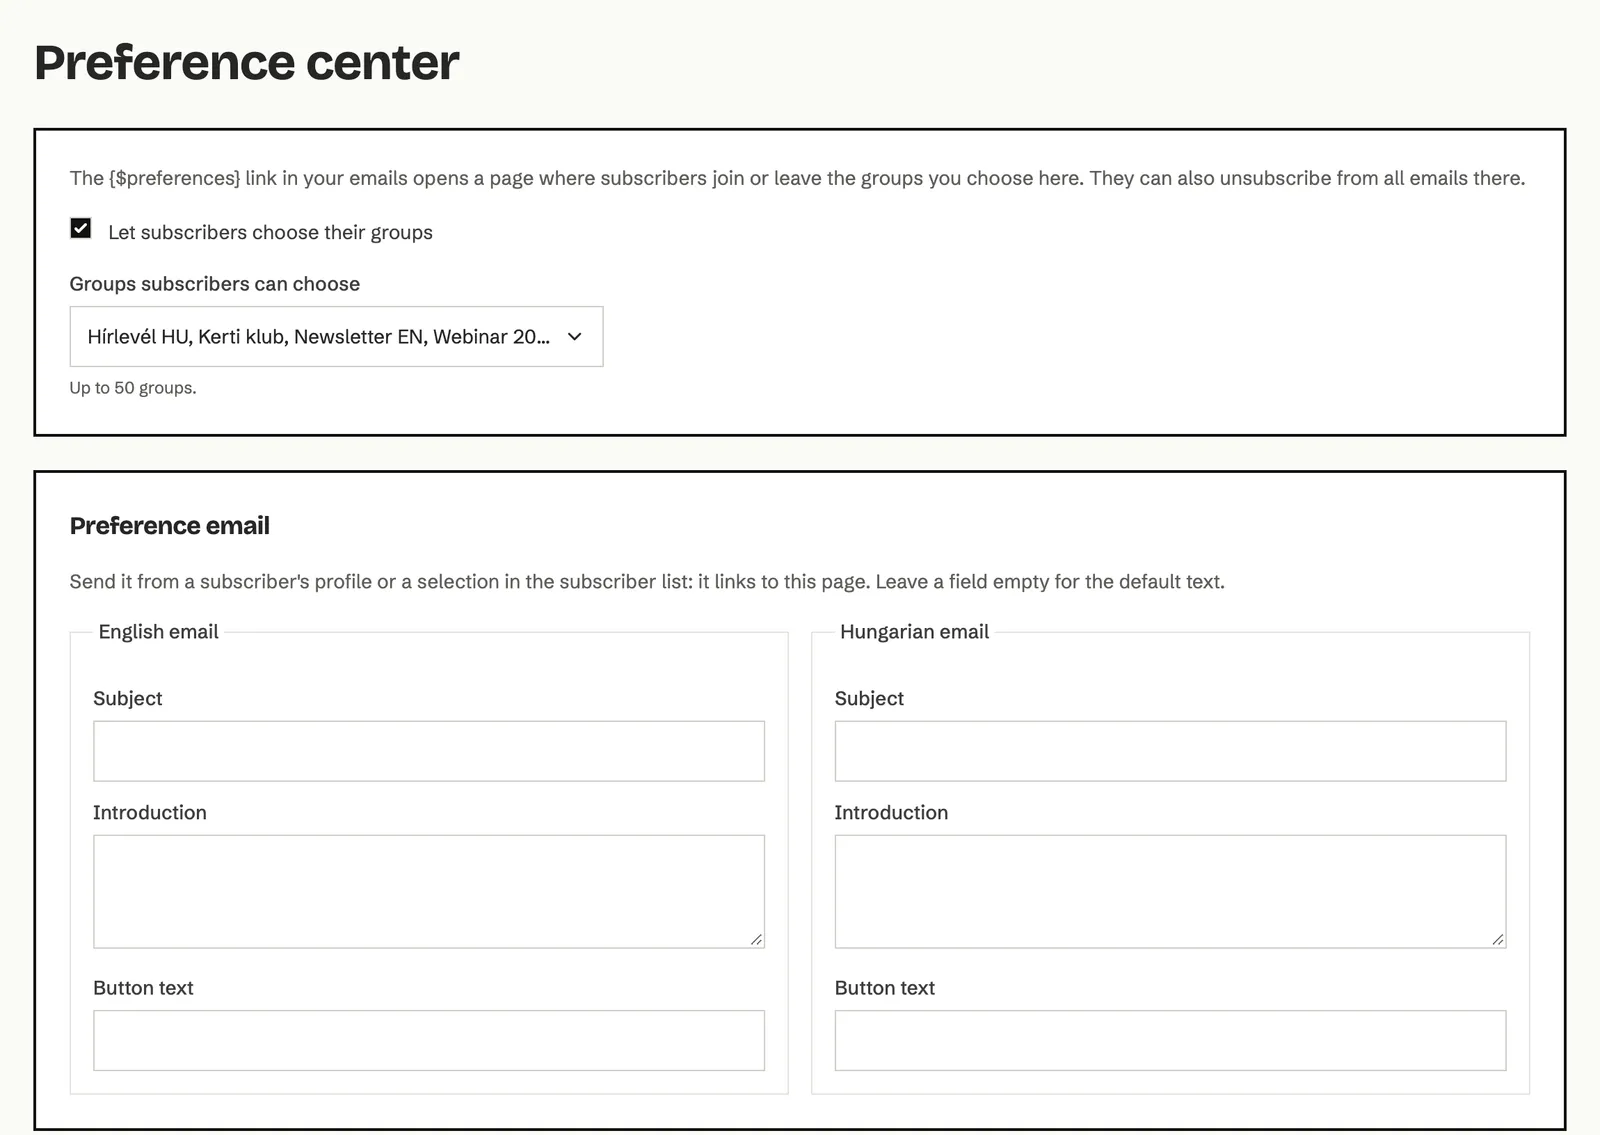
Section titled “How to turn on the preference center”The preference center is a page where subscribers choose which of your groups they belong to, for example the weekly newsletter but not the webinars. They can also unsubscribe from all emails there.
- Click Preference center in the settings menu.
- Tick Let subscribers choose their groups.
- In Groups subscribers can choose, pick the groups to show on the page.
- In the Preference email part, set the Subject, Introduction and Button text of the email that sends the preference center link, in the English email and Hungarian email boxes.
- Click Save changes.
The preference center link is in the footer of every email. You can also put it in the email text with the {$preferences} tag.
How to set up email notifications
Section titled “How to set up email notifications”Echo can also tell your team by email when something happens in the workspace.
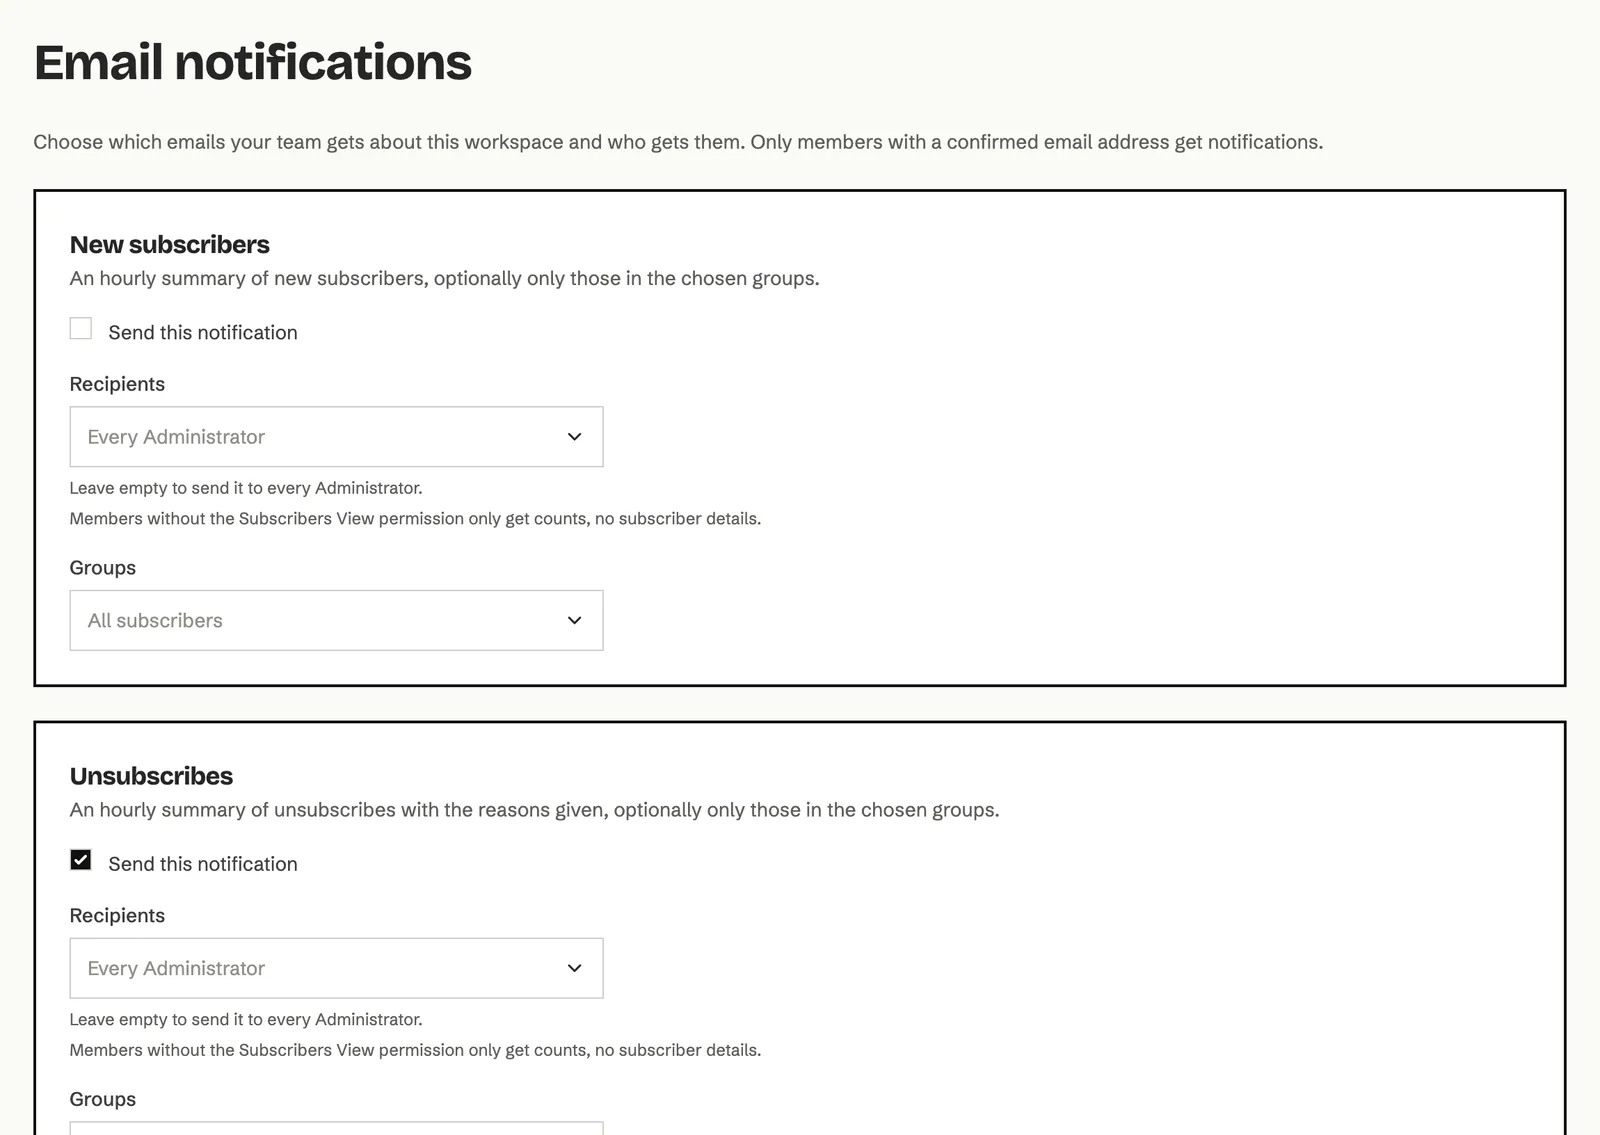
- Click Email notifications in the settings menu.
- For each notification, tick or untick Send this notification.
- In the Recipients list, choose who gets it. Left empty, every Administrator gets it.
- For New subscribers and Unsubscribes, you can narrow it to some groups in the Groups list.
- Click Save changes.
| Notification | When it goes out |
|---|---|
| New subscribers | Every hour, a summary of new subscribers. |
| Unsubscribes | Every hour, a summary of unsubscribes with the reasons given. |
| Campaign sent | When a campaign has been sent to all its recipients. |
| Import finished | When an import has finished or failed. The member who started the import always gets it. |
| Daily summary | Every day at 08:00 in the workspace’s time zone, about the day before. |
| Monthly activity | On the 1st of every month at 08:00, about the month before. |
Why can’t I send a campaign from my own address? Campaigns can only be sent from a verified domain. Open the Domains page, add the domain of your sender address and add the DNS records. Until its status is Verified, the campaign can’t go out.
I added the DNS records, but the domain is still Pending. What should I do? DNS changes can take up to 72 hours to spread. Echo checks the records by itself, but you can ask again at any time with Check now in the DNS records window. If a record stays Not found yet for long, check that you copied its name and value exactly, with the copy button.
I changed my brand styles, but my old draft didn’t change. Why? Brand styles apply to new emails. For existing drafts, open the Default settings tab, tick Update existing drafts and click Save changes.
Why didn’t someone I added by hand get a confirmation email? Double opt-in only applies to new subscribers coming in through the API, a form or an integration. Subscribers you add by hand or import are active right away, so only add people who agreed to get your emails.
How do I find out why my readers unsubscribe? Turn on Ask subscribers why they unsubscribe on the Unsubscribe settings page. You see the results at the bottom of the same page, on the Statistics card, and the reasons per campaign in the campaign’s report.