
Automations
Under Automations you build workflows that send the right email at the right time on their own: they welcome new subscribers, wish people a happy birthday, or win back readers who have gone quiet. You set it up once, and Echo takes every subscriber through it.
The automation list
Section titled “The automation list”Open Automations in the left menu. There are two tabs:
- Workflows: active and paused workflows.
- Drafts: workflows you haven’t activated yet, or that need fixing. The card also tells you why it is here: Not activated yet, … steps to complete, or A group, segment or field it uses was deleted.
The number in brackets next to each tab is the count. Use Search by name to filter by name.
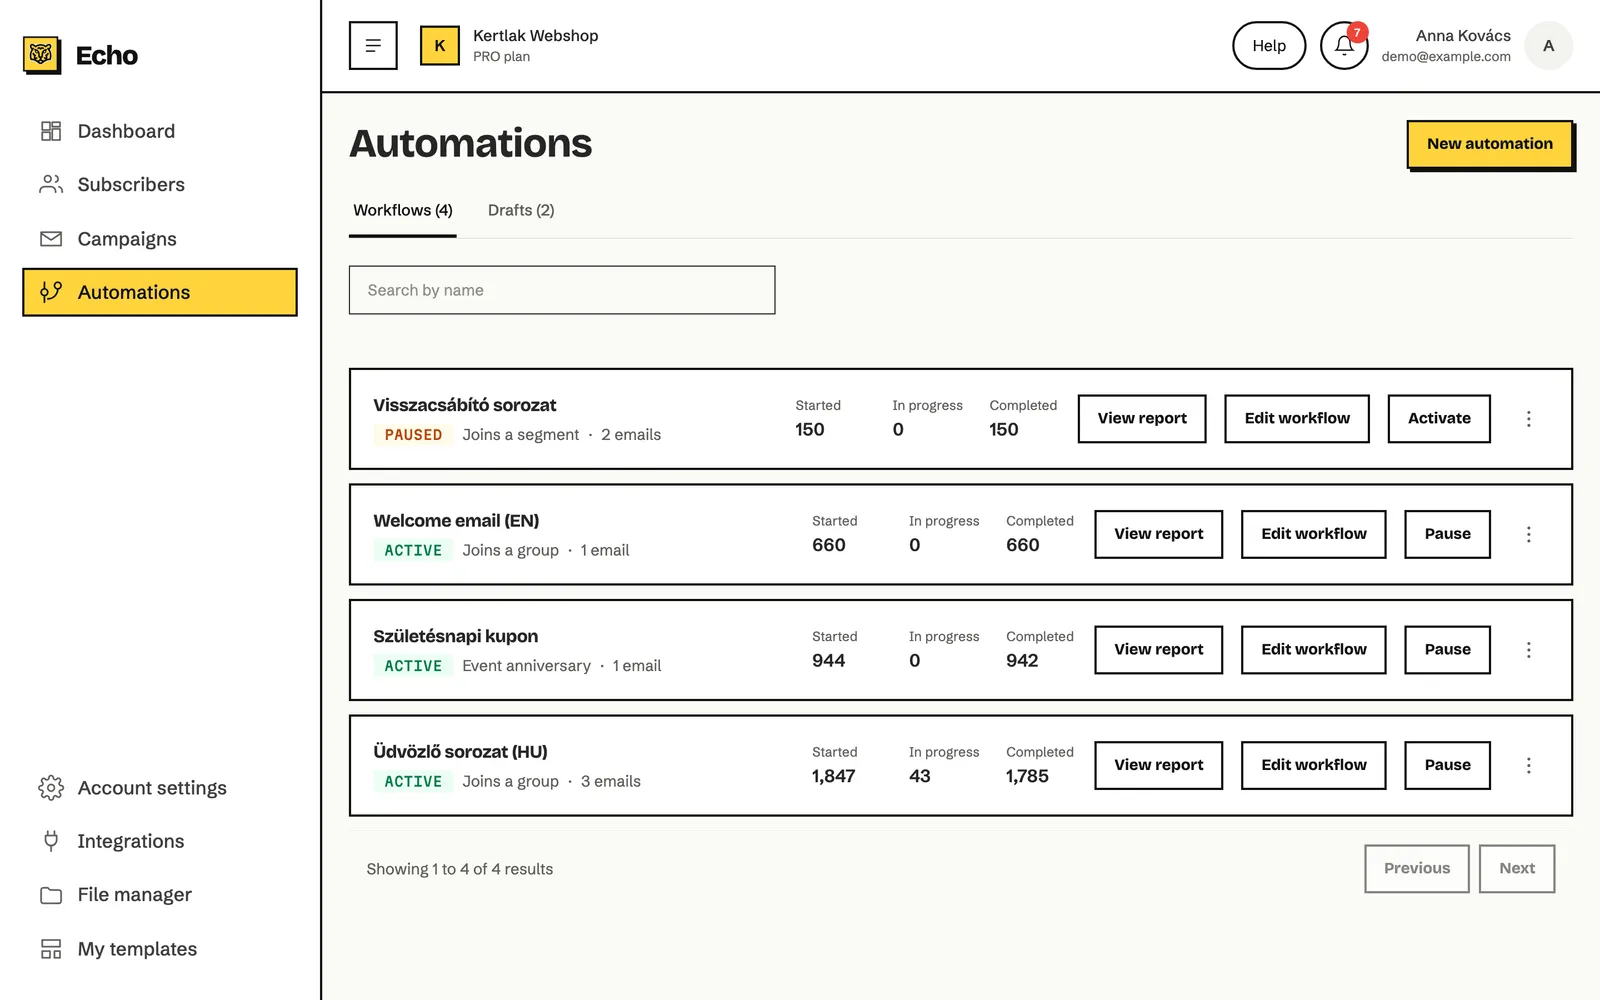
Each card shows the workflow’s name, its status (Active, Paused or Draft), its trigger, the number of emails, and three numbers: how many subscribers Started, how many are still In progress, and how many Completed. The card’s buttons:
| Button | What it does |
|---|---|
| View report (Overview on a draft) | Opens the workflow’s report. |
| Edit workflow | Opens the canvas. Clicking the name does the same. |
| Activate | Starts the workflow for new subscribers. To let existing subscribers in too, activate it from the canvas (see below). |
| Pause | Stops an active workflow. |
How to create an automation
Section titled “How to create an automation”-
Click New automation in the top right corner.
-
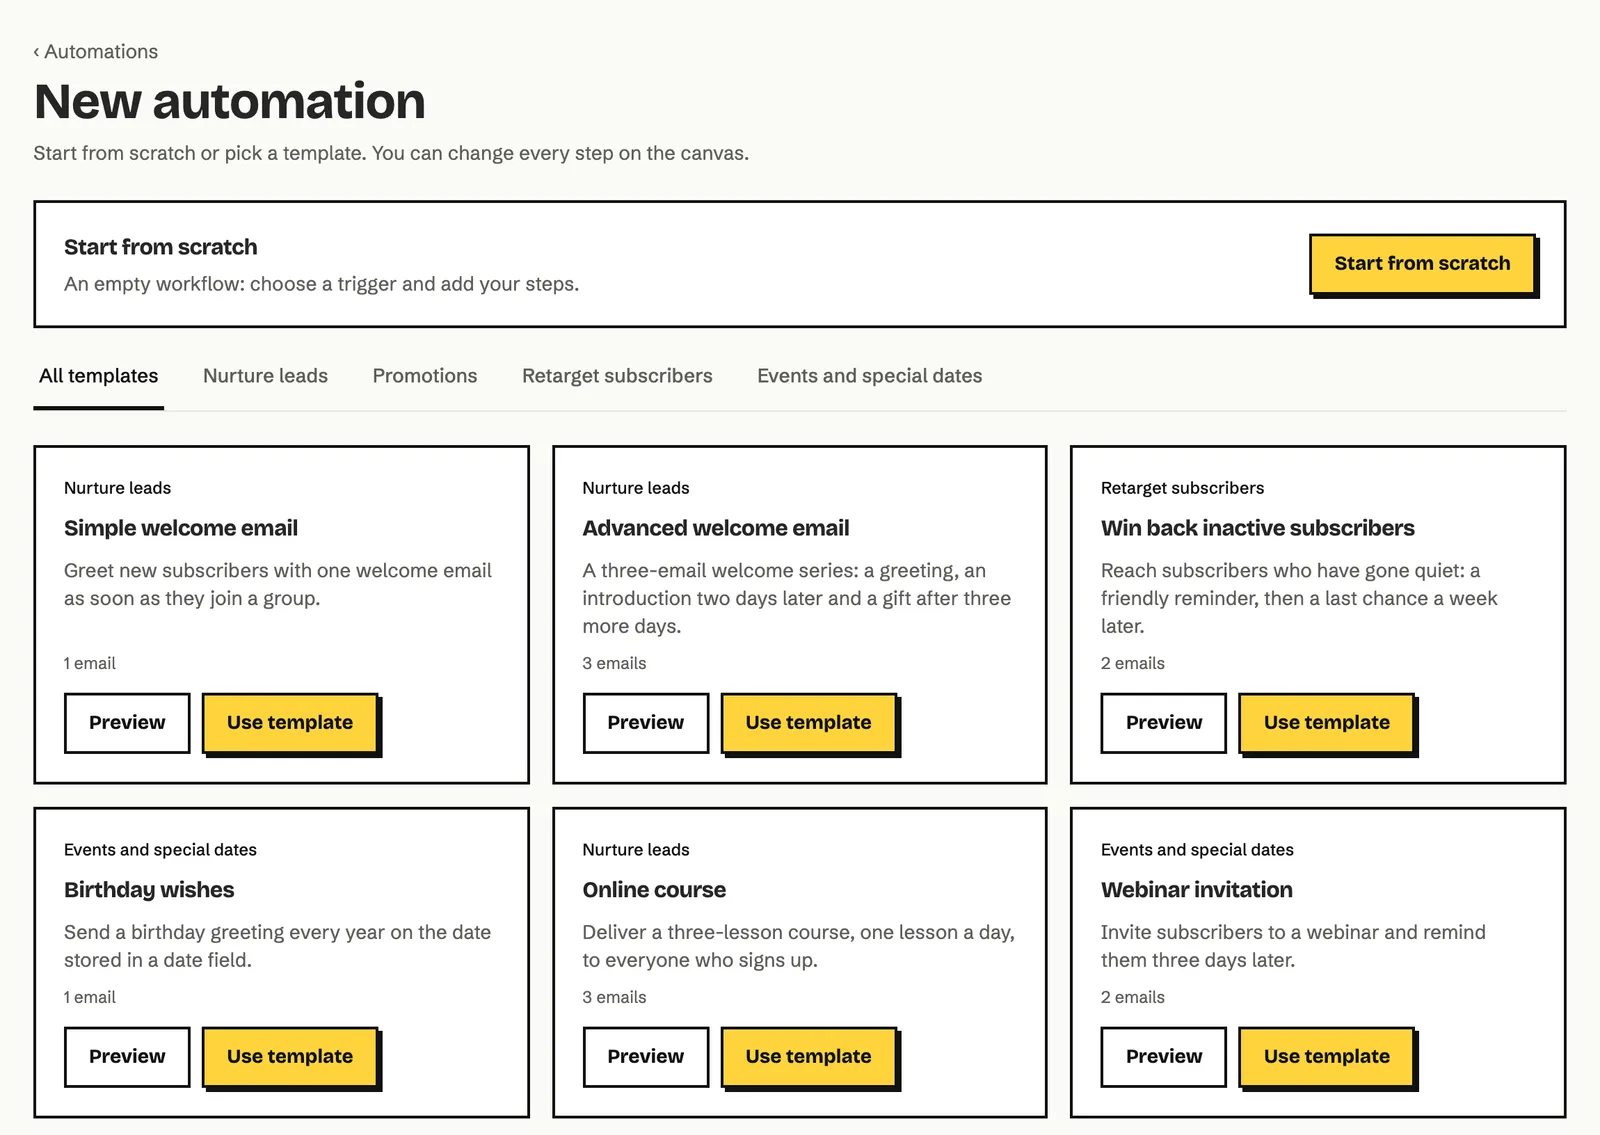
Choose where to start:
- Start from scratch: an empty workflow. You add the trigger and the steps.
- Use template: a ready-made outline for a common job, such as Advanced welcome email, a birthday greeting or winning back inactive subscribers. Use the tabs above to filter by category.
-
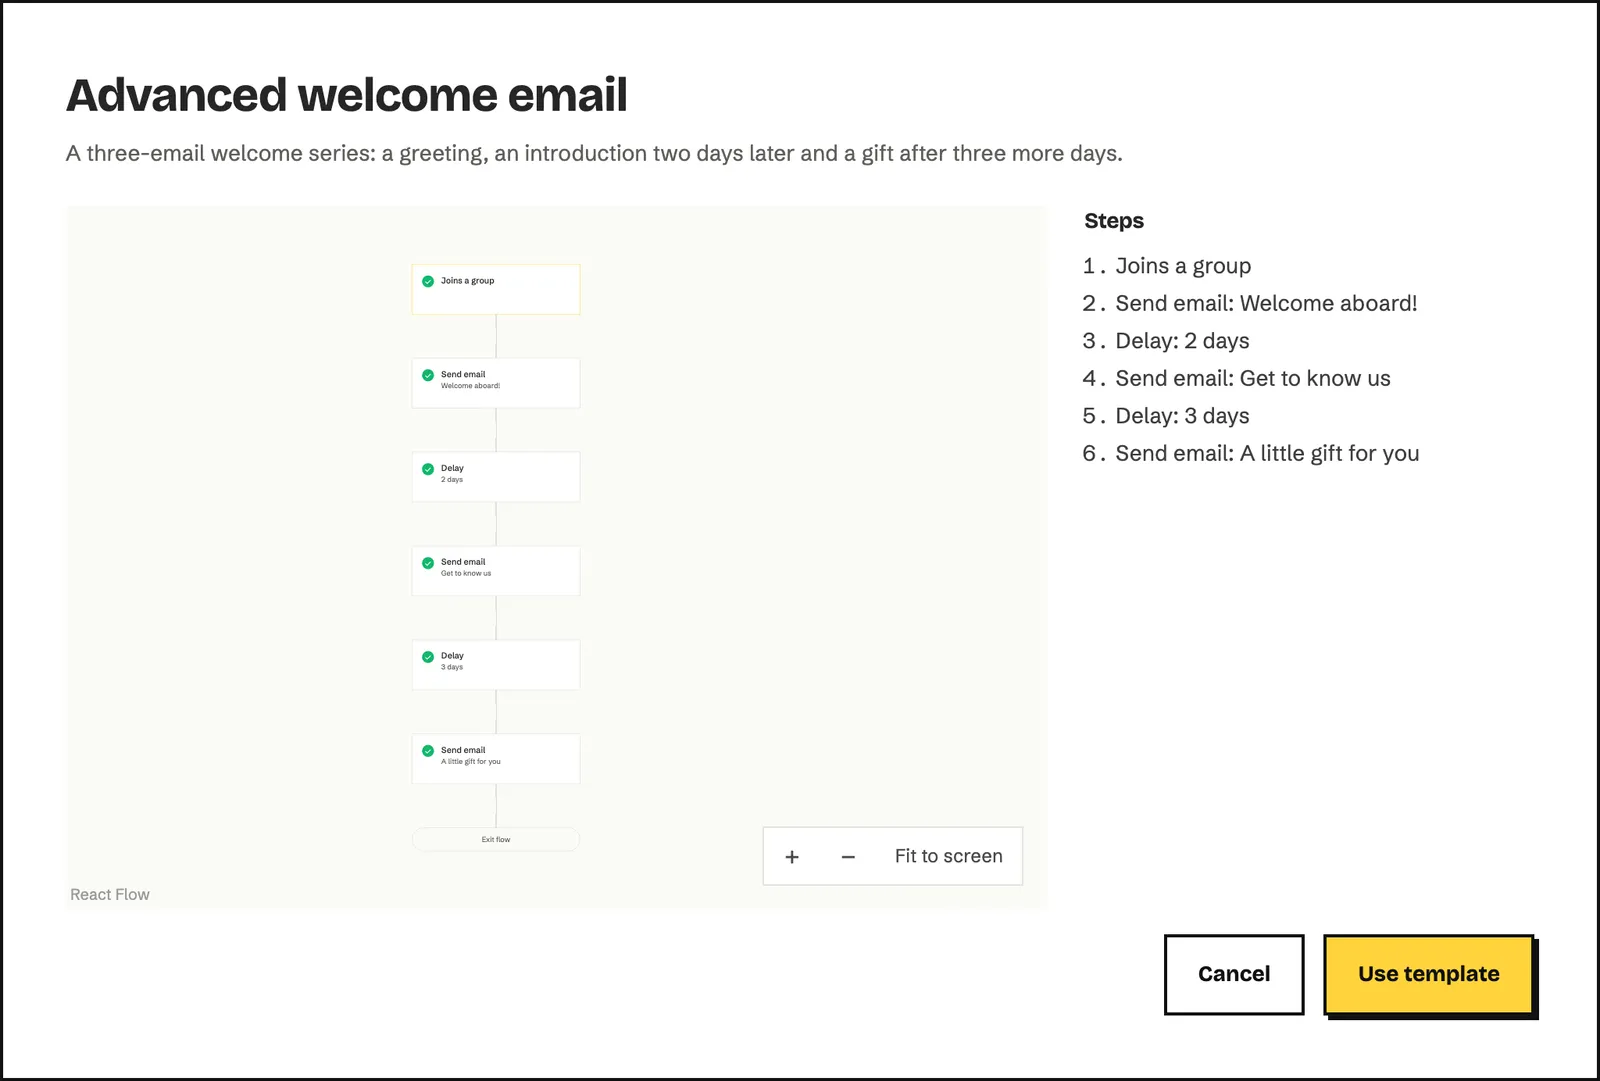
To look at a template first, click Preview. The window shows the flow on the left and the list of steps on the right.
-
Enter a name in Workflow name and click Create.
Echo creates the workflow as a draft and opens the canvas. Nothing is sent to anyone until you activate it.
The canvas
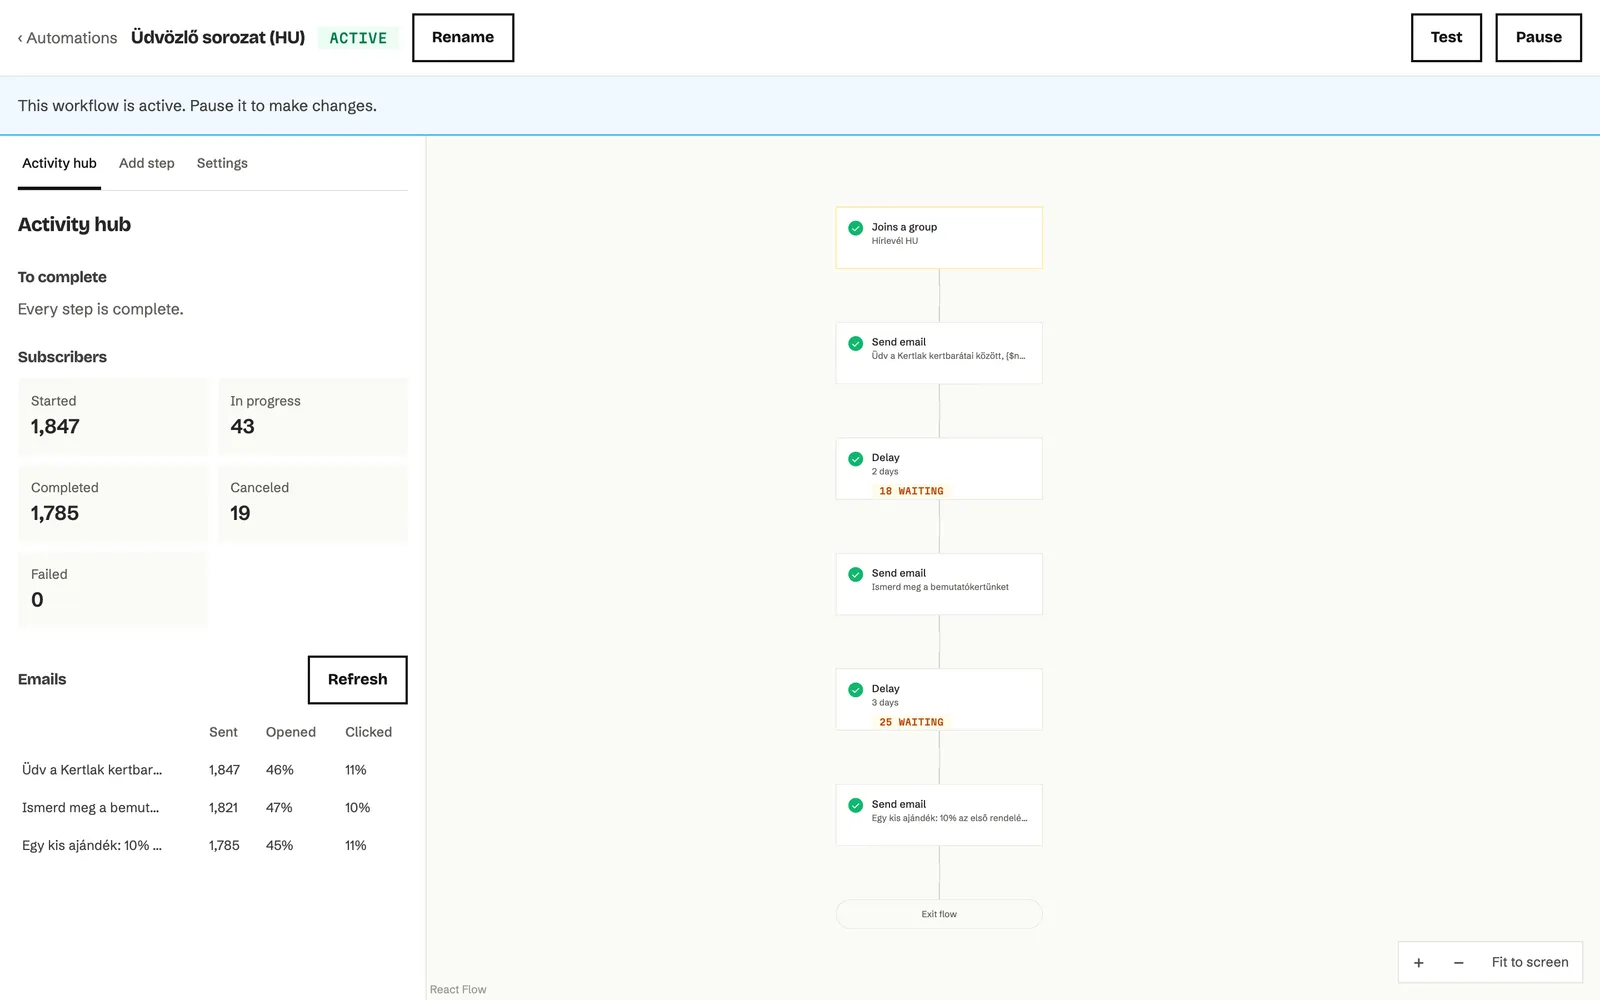
Section titled “The canvas”The canvas is the workflow editor. Read it from top to bottom: the trigger at the top, the steps below it in order, and Exit flow where a subscriber’s path ends.
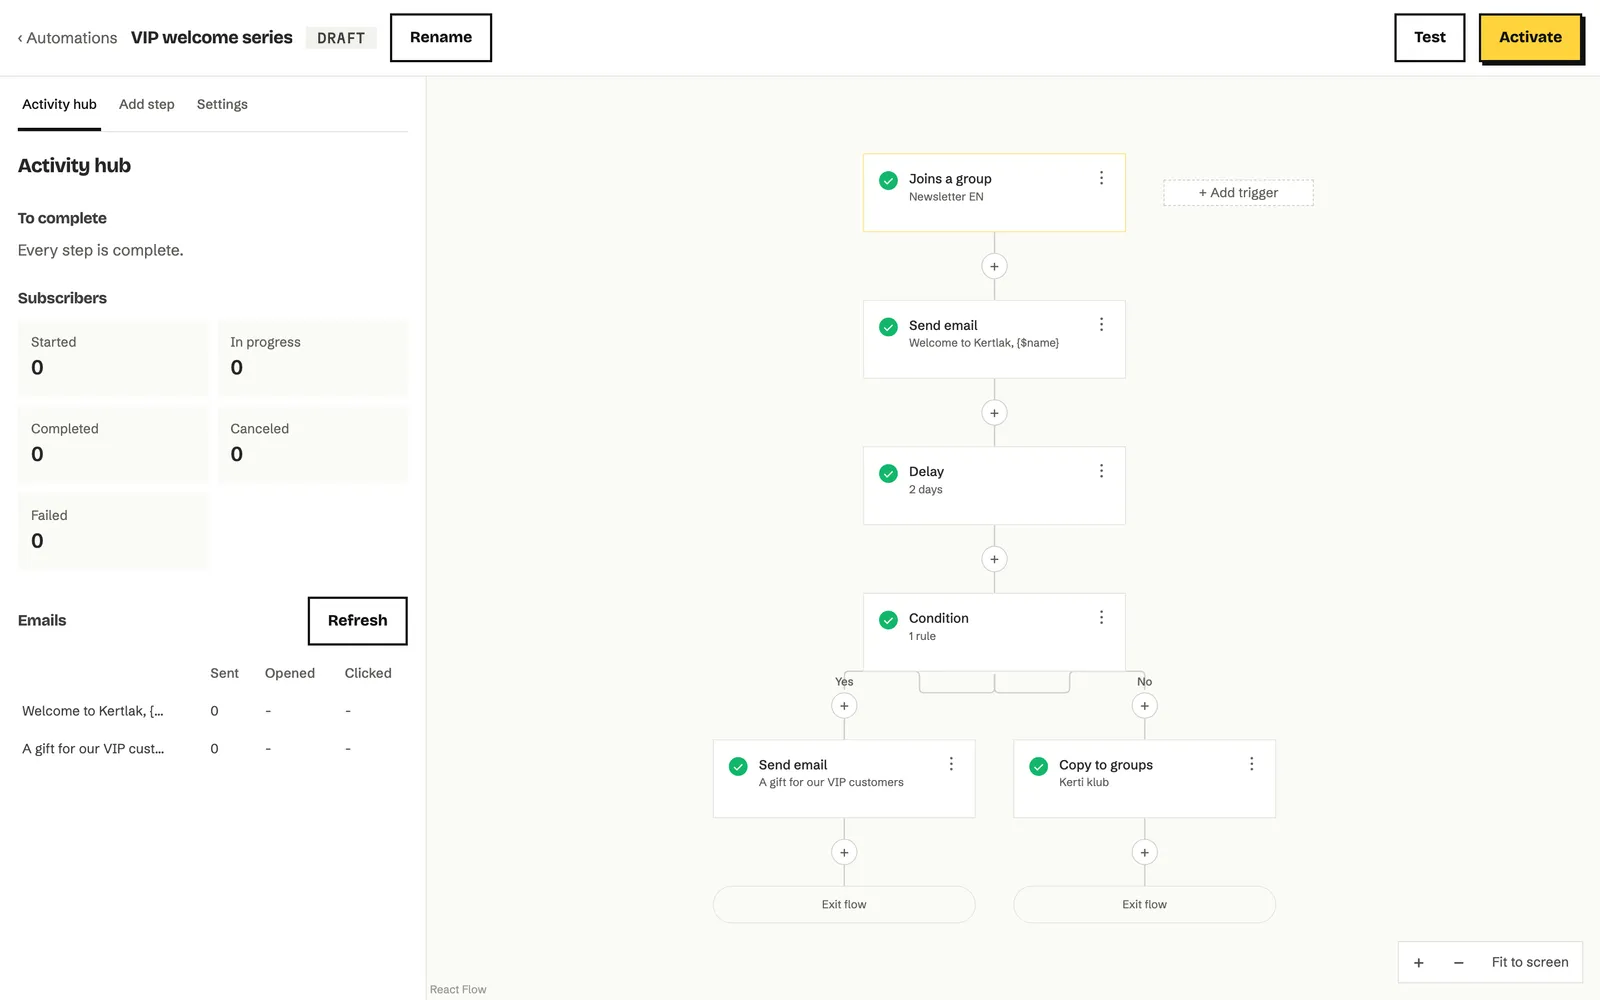
- Top bar: the workflow’s name and status, and the Rename, Test and Activate buttons (Pause on an active workflow). It also shows when your changes are saved (● Saved). There is no save button: the canvas saves every change on its own.
- Left sidebar: the Activity hub shows what is left to do (To complete), the subscriber numbers and the email results. The Add step tab lists the step types, and the Settings tab holds re-entry.
- Canvas: click a step to open its settings panel on the right. Use the + buttons between steps to insert a new step. In the bottom right corner you can zoom in and out, and Fit to screen shows the whole flow at once.
Every step has a three-dot menu in its top right corner: Copy, Cut and Delete. After copying or cutting, click one of the Drag a step here spots on the canvas to put the step down. The trigger’s menu has Replace and Delete.
How to choose a trigger
Section titled “How to choose a trigger”The trigger decides who enters the workflow and when.
-
In an empty workflow, click Choose a trigger at the top of the canvas. If there is a trigger already, use + Add trigger next to it to add another one.
-
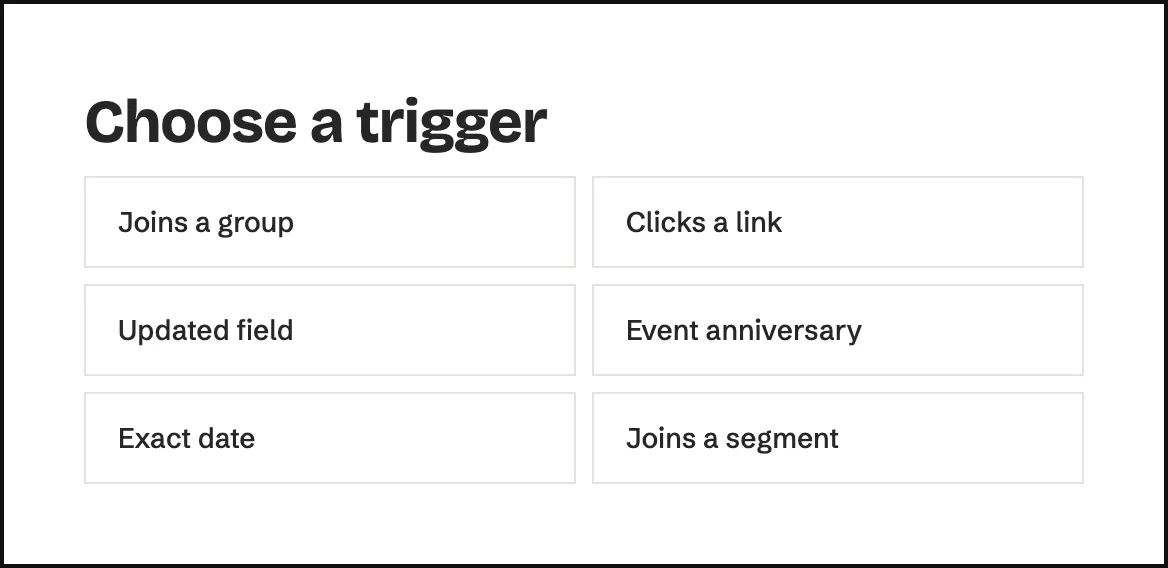
Choose the trigger type.
-
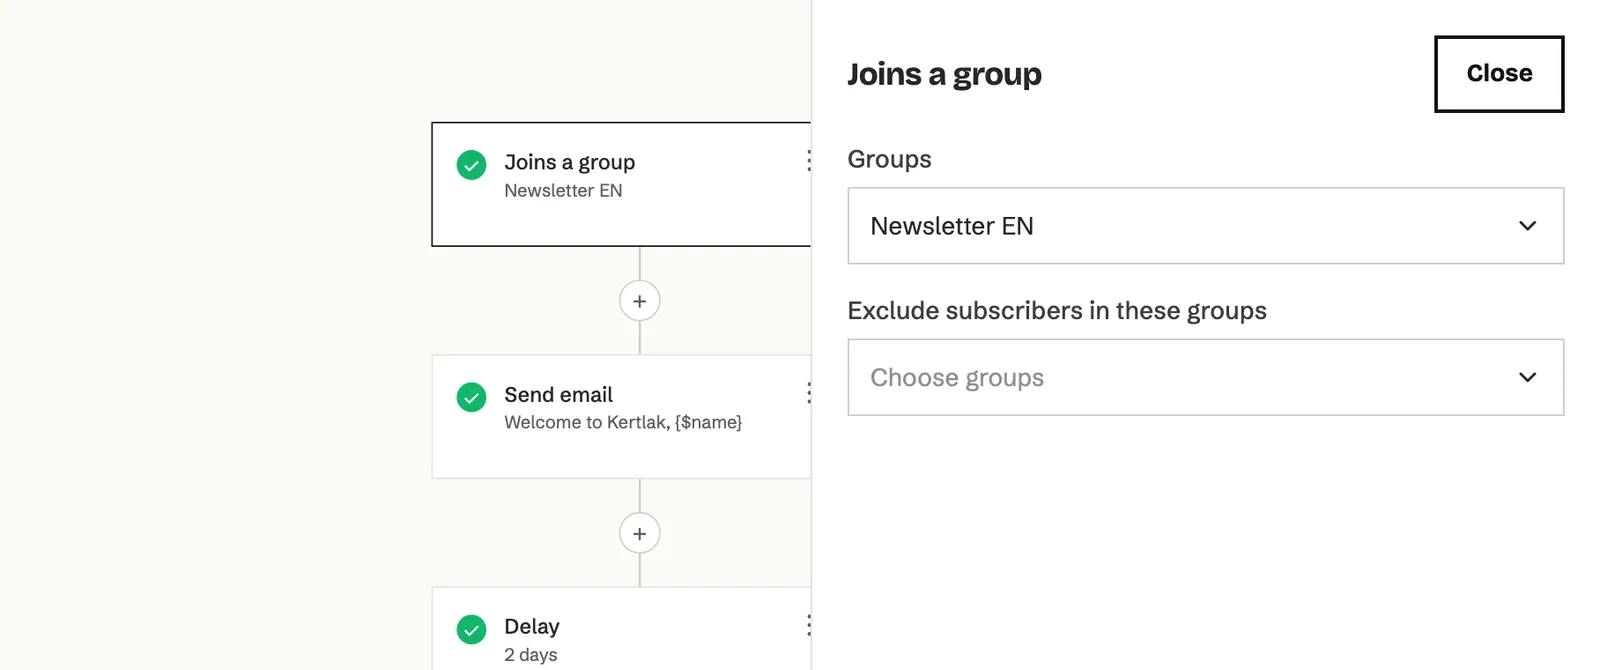
Fill in the details in the panel on the right, for example the group.
| Trigger | When someone enters | What you set |
|---|---|---|
| Joins a group | When they are added to one of the chosen groups. | Groups, and if needed Exclude subscribers in these groups. |
| Clicks a link | When they click exactly this link in an email you sent. | Link URL. You can also pick from Links you have sent. |
| Updated field | When a field changes to a value that matches the rule. | Field, Rule (such as Is equal, Contains, Is set) and Value. |
| Event anniversary | Every year on the day in a date field, or the number of days before or after it that you set. For example a birthday. | Date field, When, Days, Time (account time zone), and Groups to narrow it down. |
| Exact date | Once, on the day in the date field, or the number of days before it that you set. For example when a subscription ends. | The same as Event anniversary. |
| Joins a segment | When they come into the chosen segment. | Segment. |
How to add a step
Section titled “How to add a step”-
Click the + on the canvas where you want the step.
-
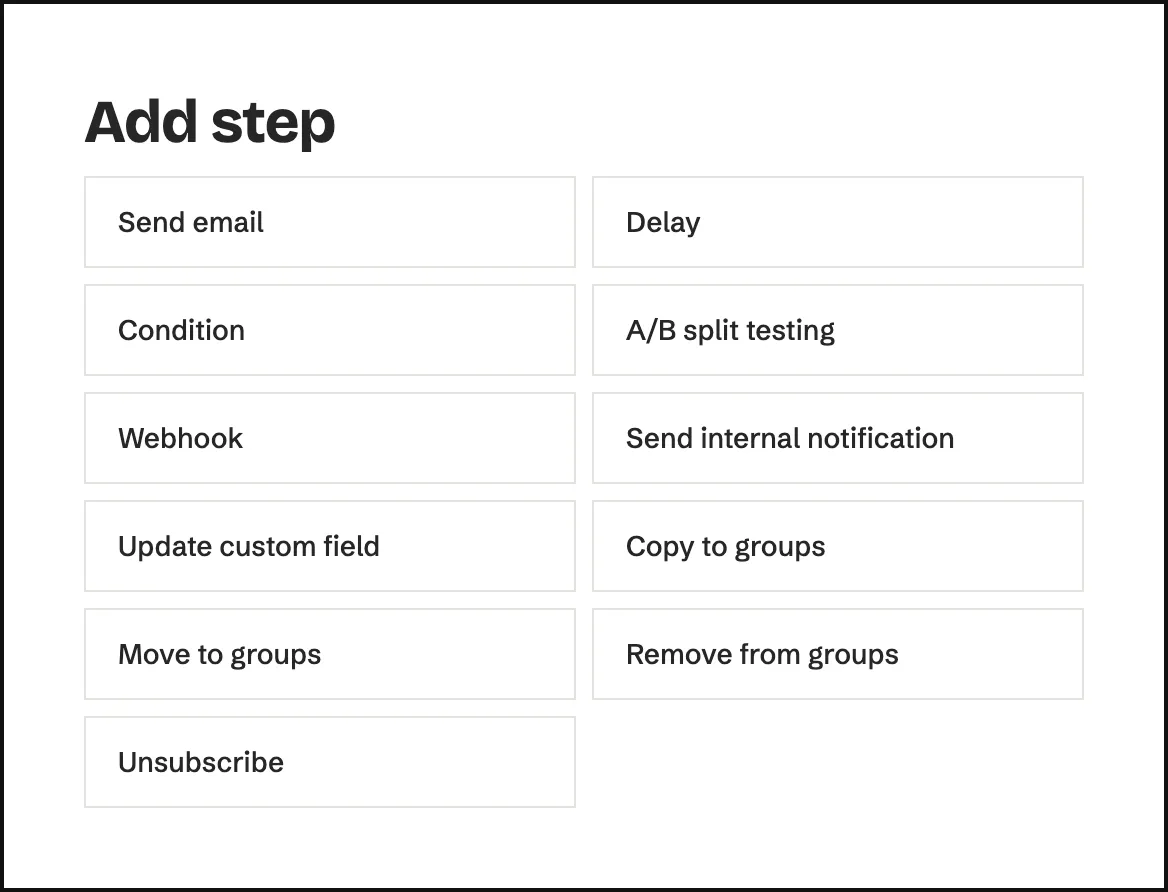
Choose the step type. Only the types that fit there are listed.
-
Fill in the step’s settings in the panel on the right.
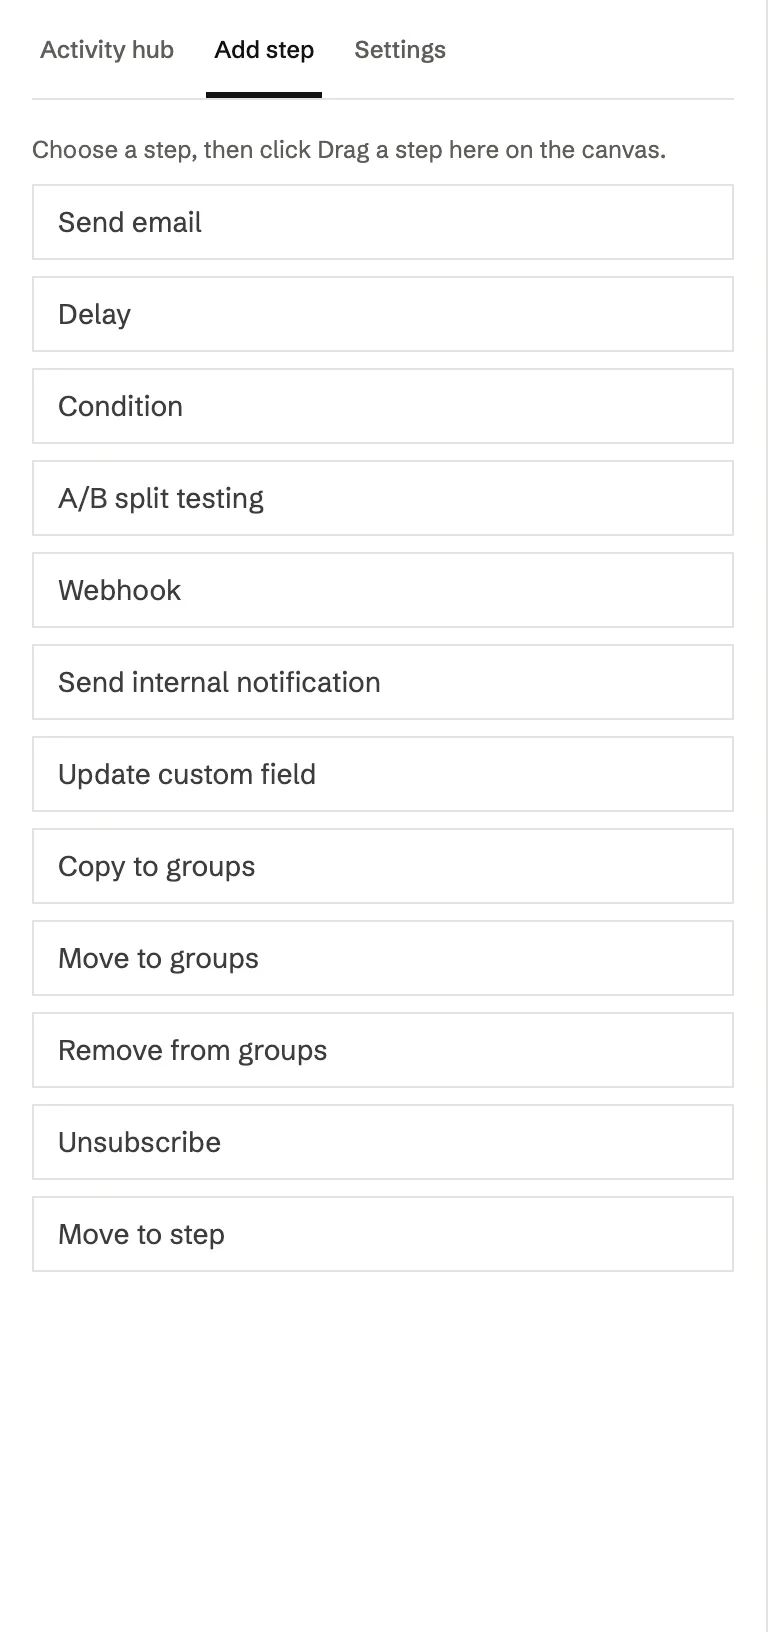
Another way: on the Add step tab of the left sidebar, click a type, then click one of the Drag a step here spots on the canvas.
| Step | What it does |
|---|---|
| Send email | Sends an email to the subscriber. |
| Delay | Waits for a while, or until a set time. |
| Condition | Splits the flow into two branches (Yes and No) based on the condition. |
| A/B split testing | Sends subscribers down two or three paths at random. |
| Webhook | Sends a signed request with the subscriber’s data to an address you set, for example your webshop. |
| Send internal notification | Sends a plain text email to members of your team, for example about a new lead. |
| Update custom field | Writes a value into one of the subscriber’s fields. Left empty, it clears the field. |
| Copy to groups | Adds the subscriber to the chosen groups. |
| Move to groups | Adds them to the chosen groups and removes them from the workflow’s trigger groups. |
| Remove from groups | Removes them from the chosen groups. |
| Unsubscribe | Unsubscribes the subscriber. Later email steps are skipped, other steps still run, and their paths in other workflows end. |
| Move to step | Continues at another step of the flow. A jump back to an earlier step needs a delay on the way. |
How to set up an email step
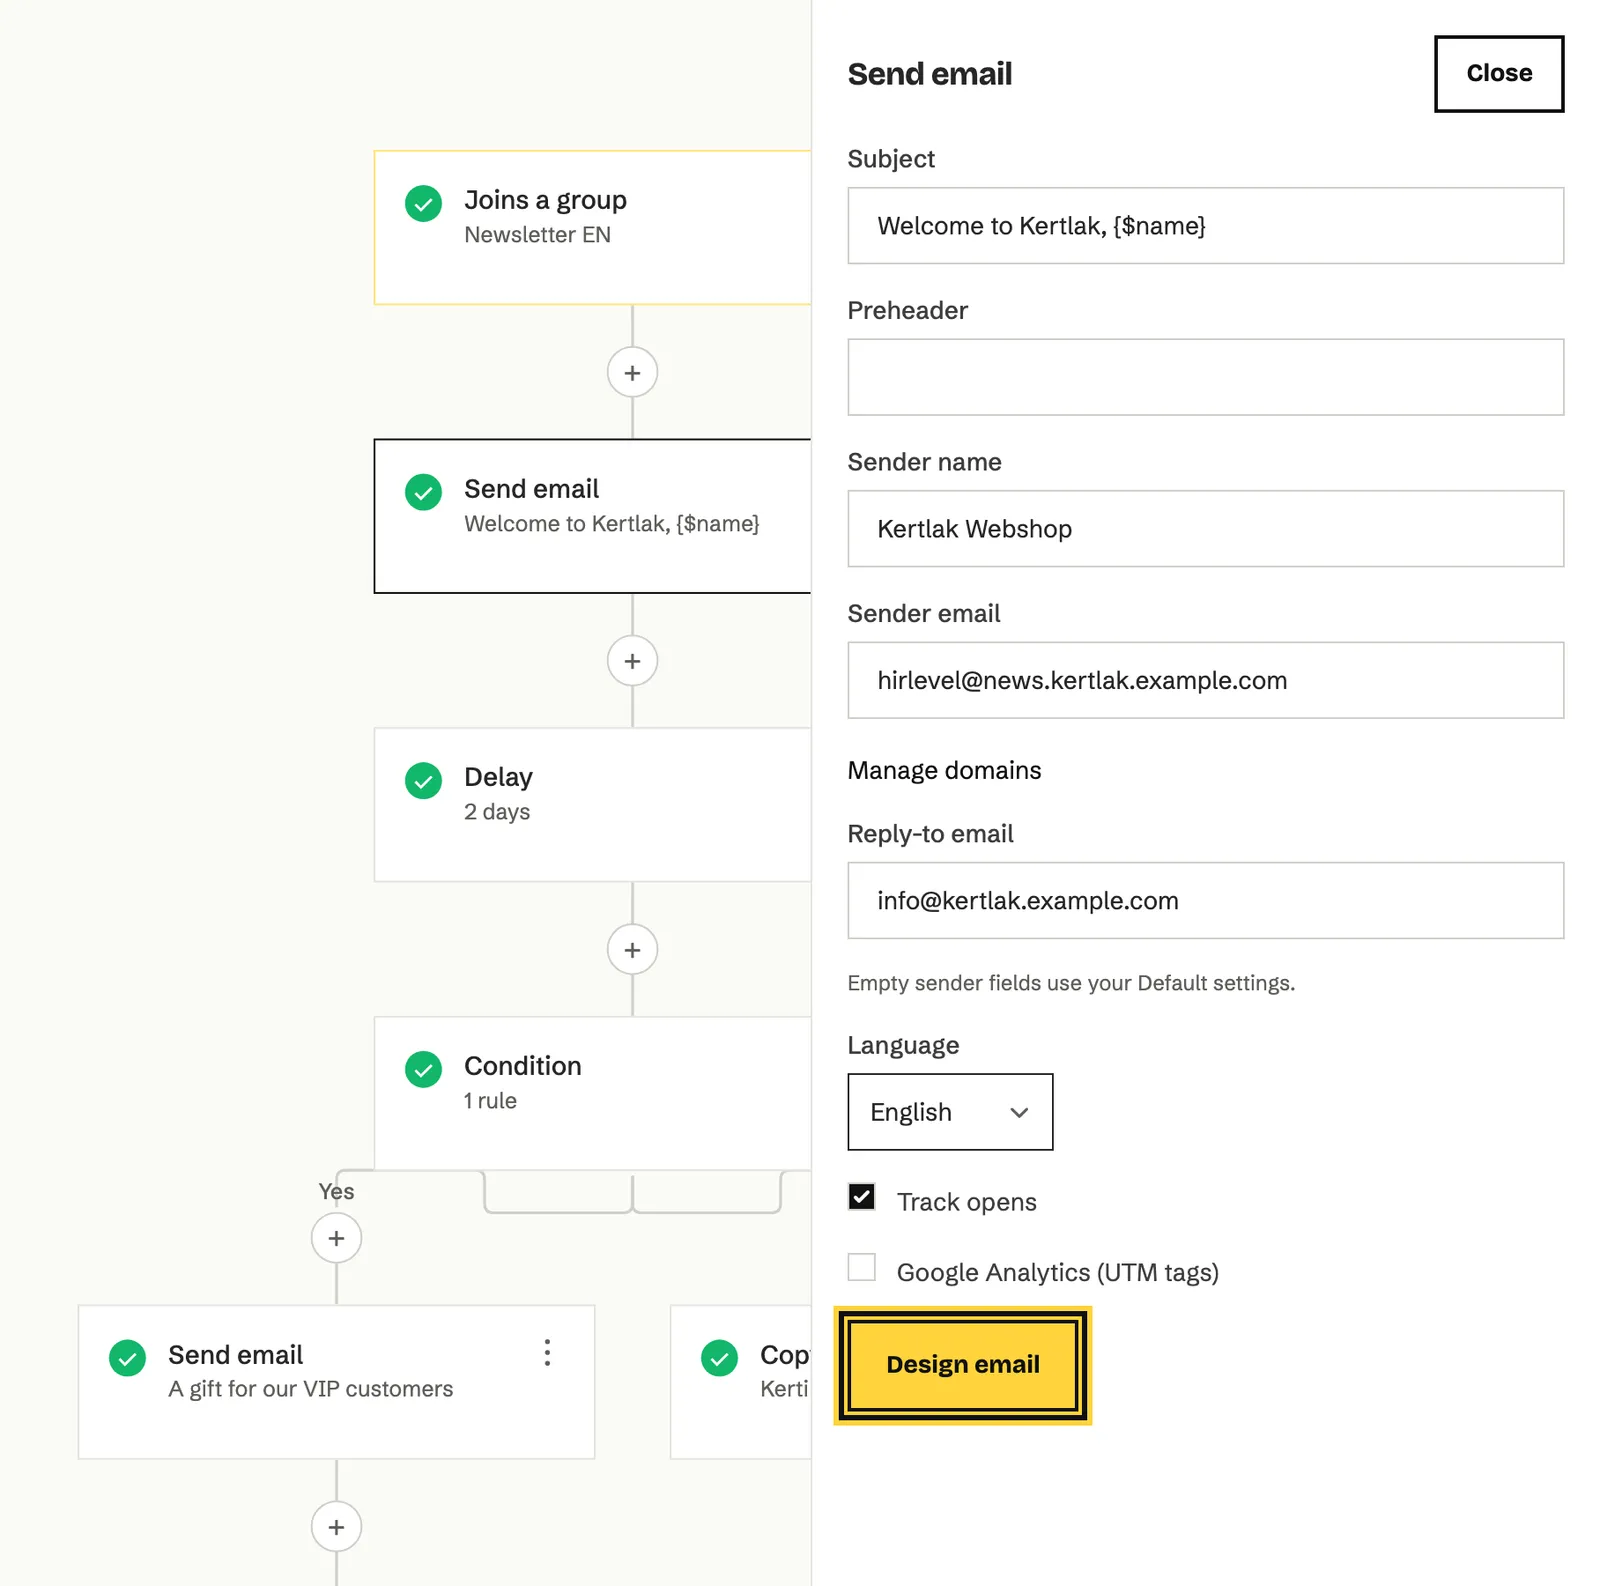
Section titled “How to set up an email step”- Click the Send email step on the canvas.
- Fill in Subject. The Preheader is the short text shown next to the subject in the inbox.
- Change Sender name, Sender email and Reply-to email if needed. Empty fields use your Default settings.
- Choose the email’s Language, and decide whether you want Track opens and Google Analytics (UTM tags).
- Click Design email.
How to design a workflow email
Section titled “How to design a workflow email”You design workflow emails with the same editors as campaigns.
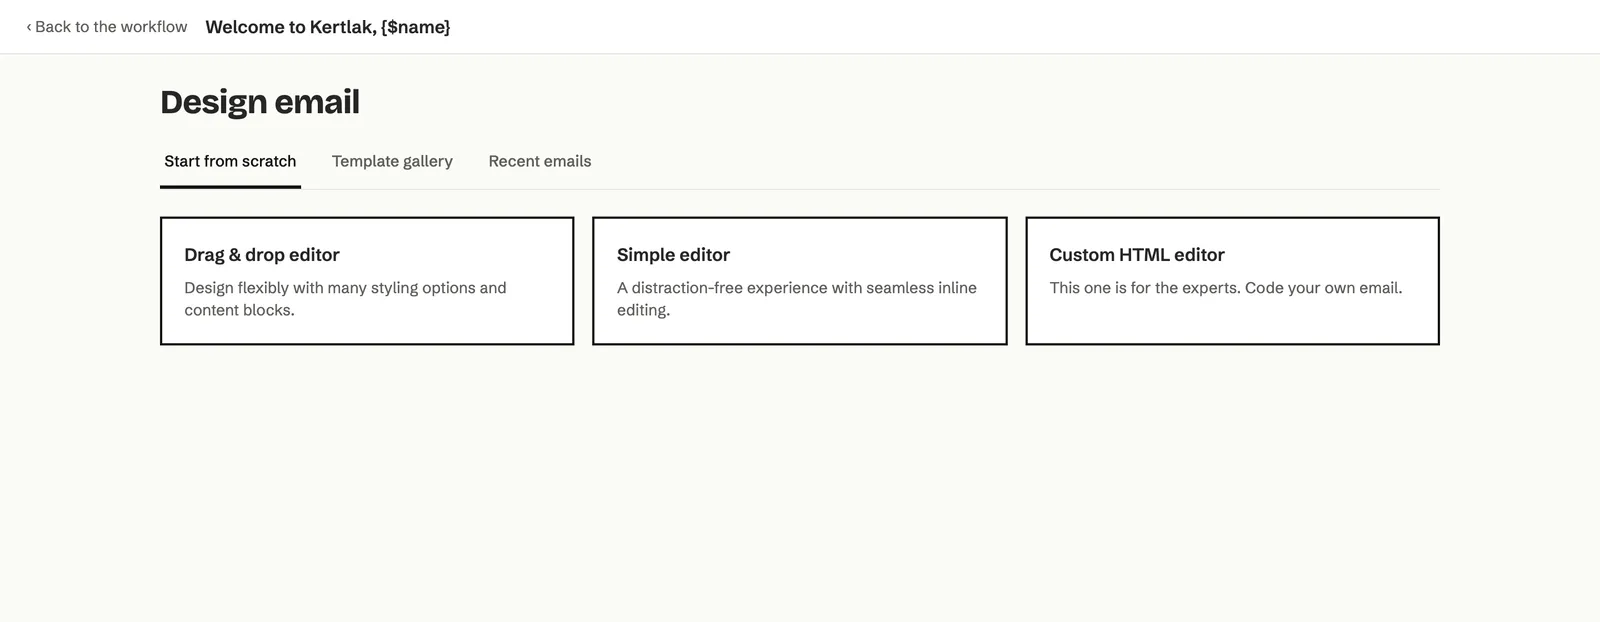
- In the email step’s panel, click Design email. If the email already has content, the button says Edit email and opens the editor straight away.
- Choose where to start:
- Start from scratch: the Drag & drop editor, the Simple editor or the Custom HTML editor.
- Template gallery: ready-made templates and your own templates.
- Recent emails: the content of an earlier campaign or workflow email.
- Edit the email, then click Done editing.
The Campaigns chapter explains how the editors work. Back to the workflow takes you back to the canvas, at the same step.
How to set up a delay
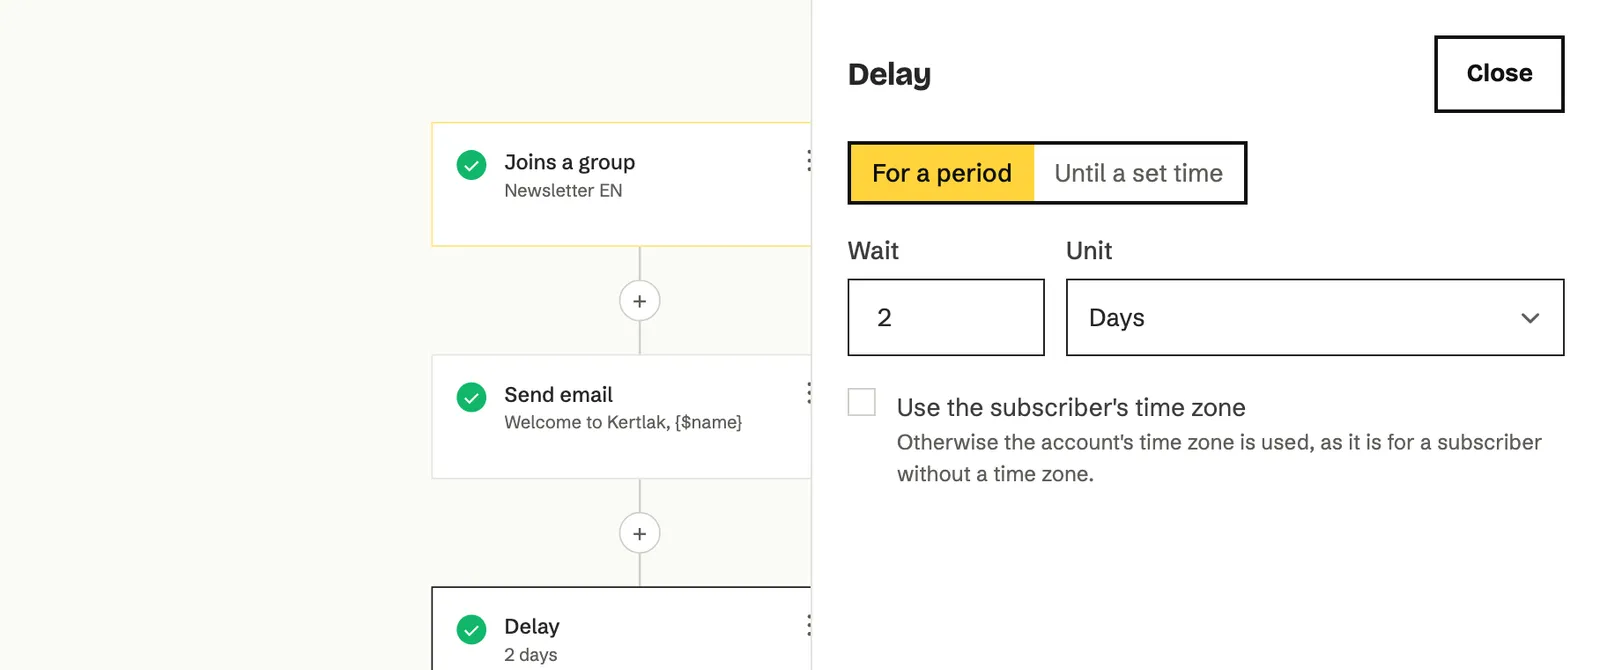
Section titled “How to set up a delay”- Click the Delay step on the canvas.
- Choose the Delay type:
- For a period: enter a number in Wait, and pick minutes, hours, days, weeks or months under Unit.
- Until a set time: under Until, choose what it waits for: A time of day, A day of the week, A day of the month, A date or The date in a field, then set the Time.
- For days, weeks and months you can tick Use the subscriber’s time zone. Otherwise the account’s time zone is used.
How to branch the flow with a condition
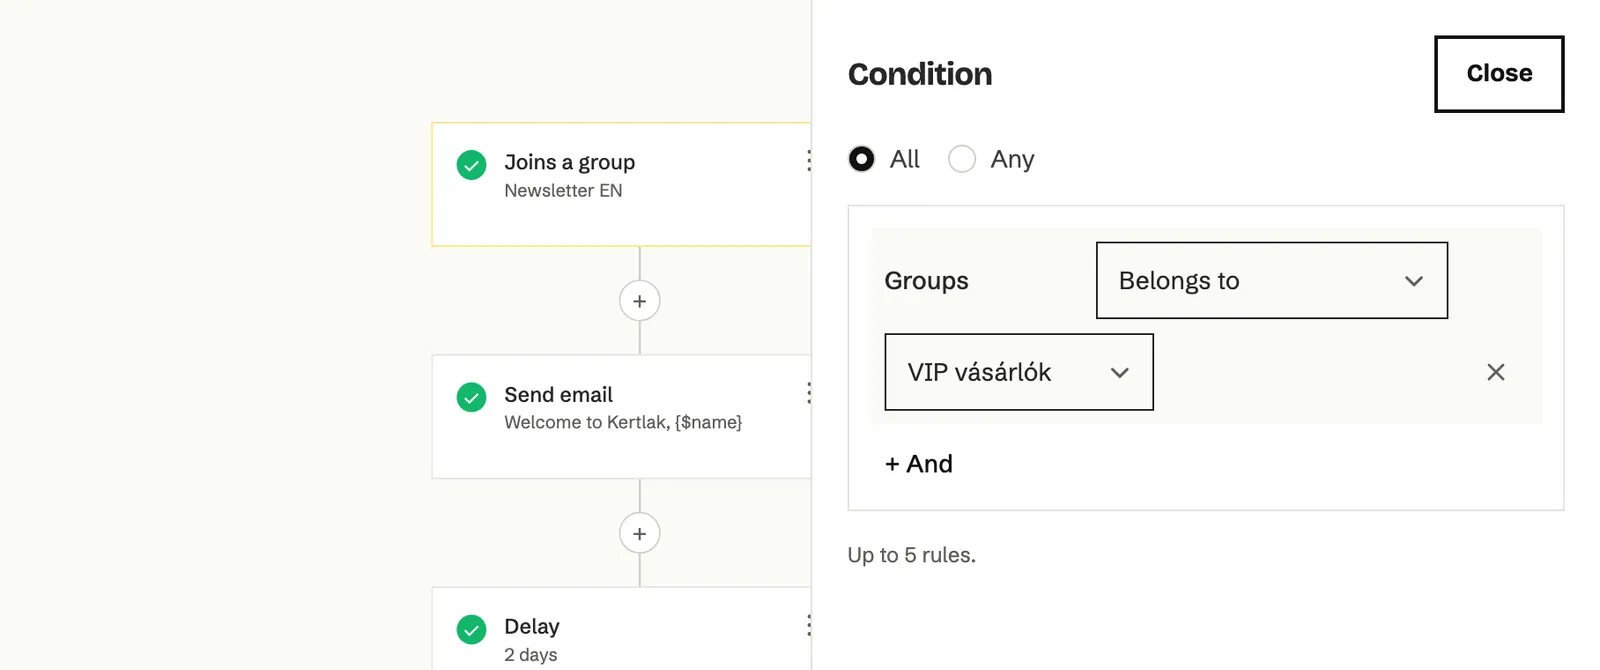
Section titled “How to branch the flow with a condition”- Click the Condition step on the canvas.
- Choose whether All of the rules must match, or Any.
- Add the rules. You can use Campaigns (for example opened or clicked a campaign), Automation workflows, Fields, Groups and Segment membership.
- On the canvas, subscribers who match go down the Yes branch, everyone else down the No branch. You can add steps to both branches.
How to test two or three versions with an A/B split
Section titled “How to test two or three versions with an A/B split”- Insert an A/B split testing step and give it a name in Name.
- Use the slider to set what percentage goes down path A. The rest goes down path B. Add path C opens a third path.
- Put an email on each path, with a delay if you like.
- After activating, View report shows how many subscribers took each path and how the emails performed.
- When you know which one works better, open the A/B split step and click, for example, Choose path A as the winner.
Once a winner is chosen, every new subscriber takes that path. This can’t be undone.
Re-entry: how often can someone enter?
Section titled “Re-entry: how often can someone enter?”By default everyone goes through a workflow once. If you want the same subscriber to be able to enter again later (for example each time they join a group again):
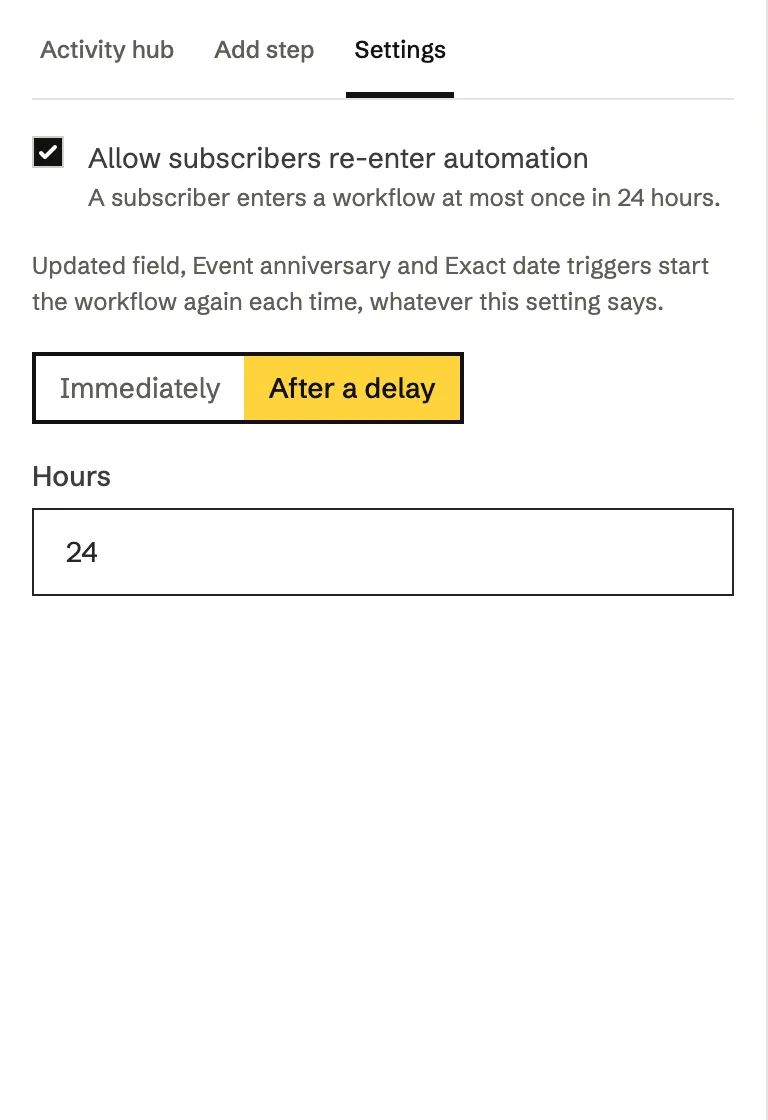
- Open the Settings tab in the left sidebar.
- Tick Allow subscribers re-enter automation.
- Choose whether they can enter again Immediately or After a delay. For a delay, enter in Hours how long must pass since their last entry (between 24 and 8760).
The rules:
| Situation | What happens |
|---|---|
| The subscriber is in the workflow right now | They can’t enter again until they finish or leave. |
| Joins a group, Clicks a link or Joins a segment trigger, re-entry off | They enter only once, even if they set off the trigger again. |
| The same triggers, re-entry on | They can enter again, at the earliest 24 hours (or the hours you set) after their last entry. |
| Updated field, Event anniversary or Exact date trigger | Starts again each time, whatever the setting says, but at most once in 24 hours. |
How to test the workflow
Section titled “How to test the workflow”Before activating, you can send the workflow’s emails to yourself.
- Click Test in the canvas top bar.
- Enter the addresses in Send to, one per line. You can enter up to 5.
- Click Send test.
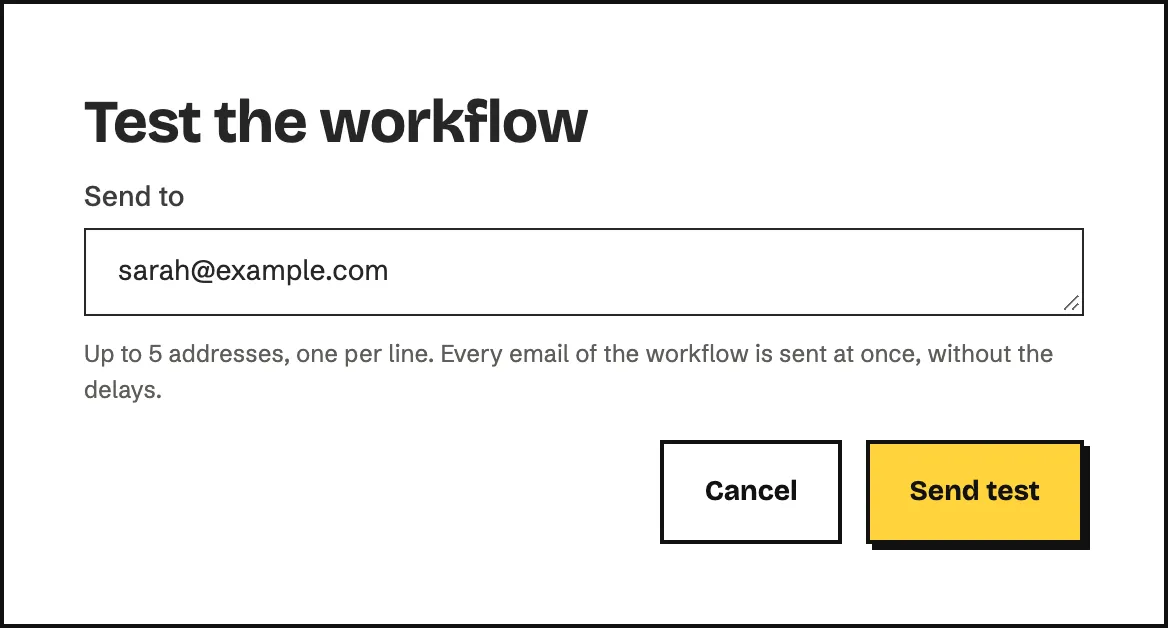
Every email of the workflow is sent at once, without the delays. The test needs at least one Send email step. If something is missing, the window lists it, and Go to step takes you there.
How to activate the workflow
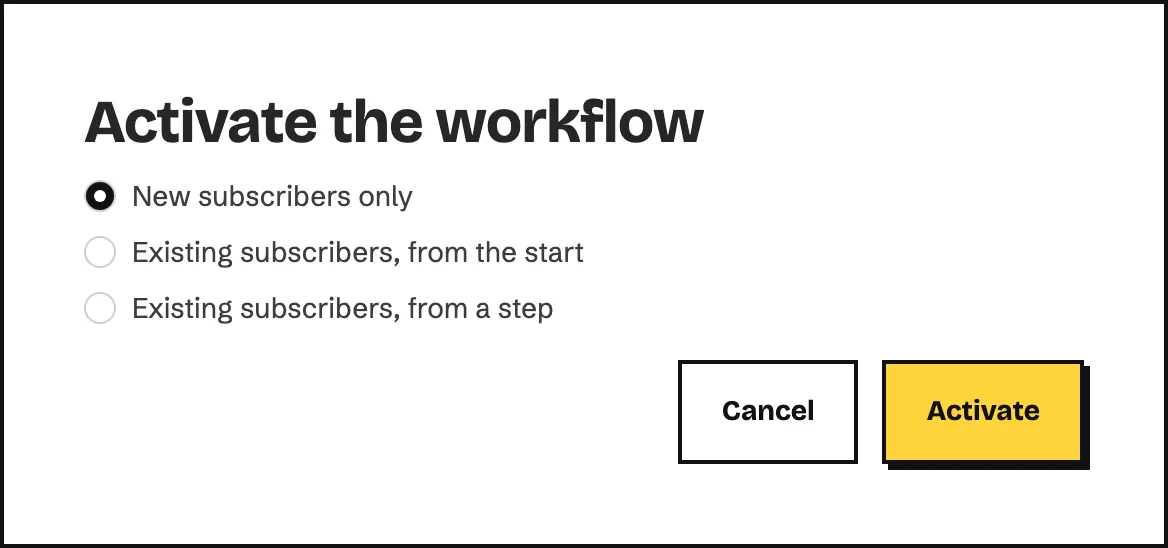
Section titled “How to activate the workflow”- Click Activate in the canvas top bar.
- Choose who enters:
- New subscribers only: only those who set off the trigger from now on.
- The two Existing subscribers options: people who are already in the trigger group or segment enter too, from the start of the workflow or from a step you choose (Step). These are only available with the Joins a group and Joins a segment triggers.
- Click Activate.
When you activate, Echo checks the workflow. If something is missing, the Fix these first: list shows it, for example Design the email., Add an unsubscribe link to the email., Verify the sender’s domain. or Add your company details in Default settings. Go to step takes you there.
Pausing: what happens to people already inside?
Section titled “Pausing: what happens to people already inside?”Click Pause in the canvas top bar or on the list card. The workflow stops at once and can be edited.
| Question | Answer |
|---|---|
| What happens to people already inside? | They stay at their step. On the canvas each delay shows how many are waiting (for example 21 waiting). |
| Are emails already queued sent? | No. Nothing is sent during the pause. After you resume, the queued emails go out. |
| Do new subscribers enter during the pause? | No. Anyone who sets off the trigger during the pause is left out, even if they joined the trigger segment meanwhile. |
| How long can it stay paused? | If a workflow is paused for more than 7 days, the paths of the subscribers still inside end, and they show up in the report’s Failed list with the reason The workflow was paused for more than 7 days. |
| How do I resume? | Click Activate. People inside continue where they stopped. |
If you edit while it is paused
- If you delete a step where subscribers are waiting, Echo tells you how many of them will leave the workflow.
- When you delete an email step, you can choose Remove (can be restored from History) or Permanently delete (its reports are deleted too).
- If you add a new step at the end of the workflow, subscribers who had already finished are brought back automatically to get the new step. The History tab shows this too.
- For changing a delay, see How to set up a delay.
How to add subscribers by hand
Section titled “How to add subscribers by hand”You can put subscribers into an active workflow without the trigger, for example if someone was missed.
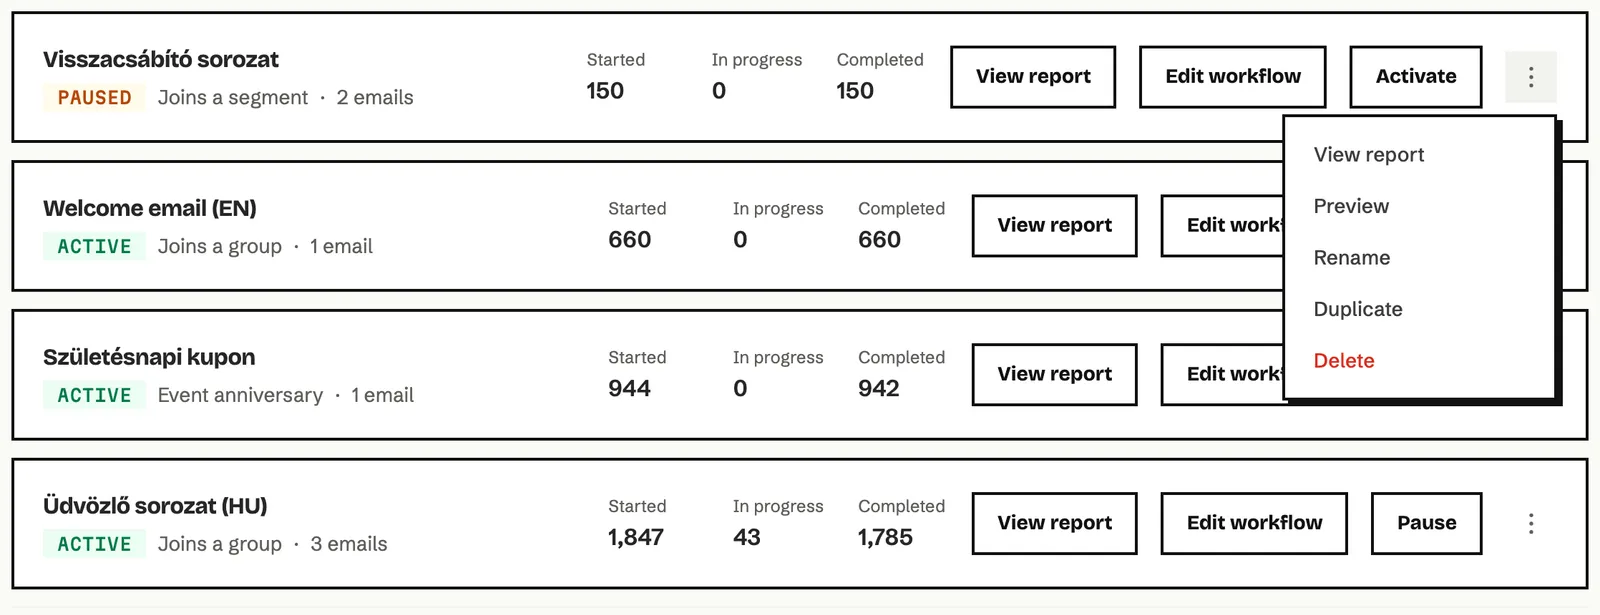
- On the list card, open the three-dot menu and choose Add subscribers.
- Choose whether you add Subscribers one by one (find them in Search subscribers) or A group.
- Under Start at, choose where they start: The start of the workflow or a step.
- Click Add.
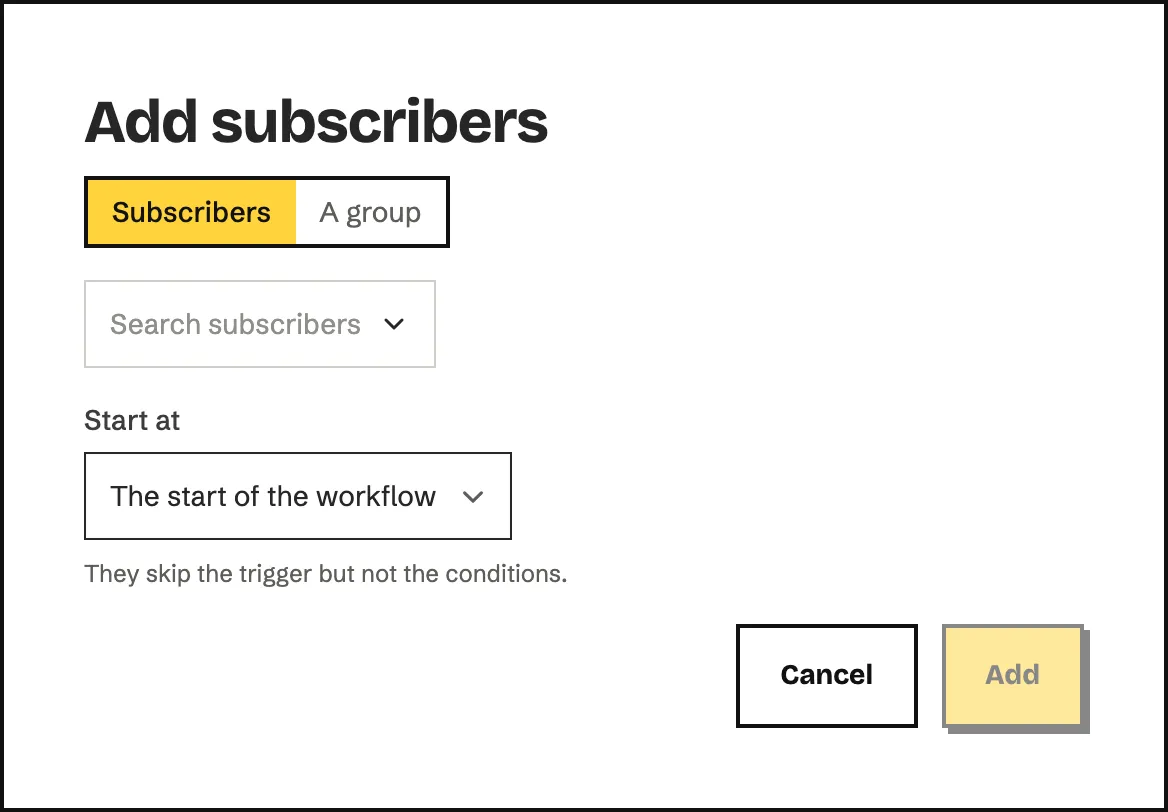
Added subscribers skip the trigger but not the conditions. People already in the workflow, or who entered it in the last 24 hours, are skipped. Only active subscribers can be added.
How to read the workflow report
Section titled “How to read the workflow report”Click View report on the card. The report has three tabs.
Overview
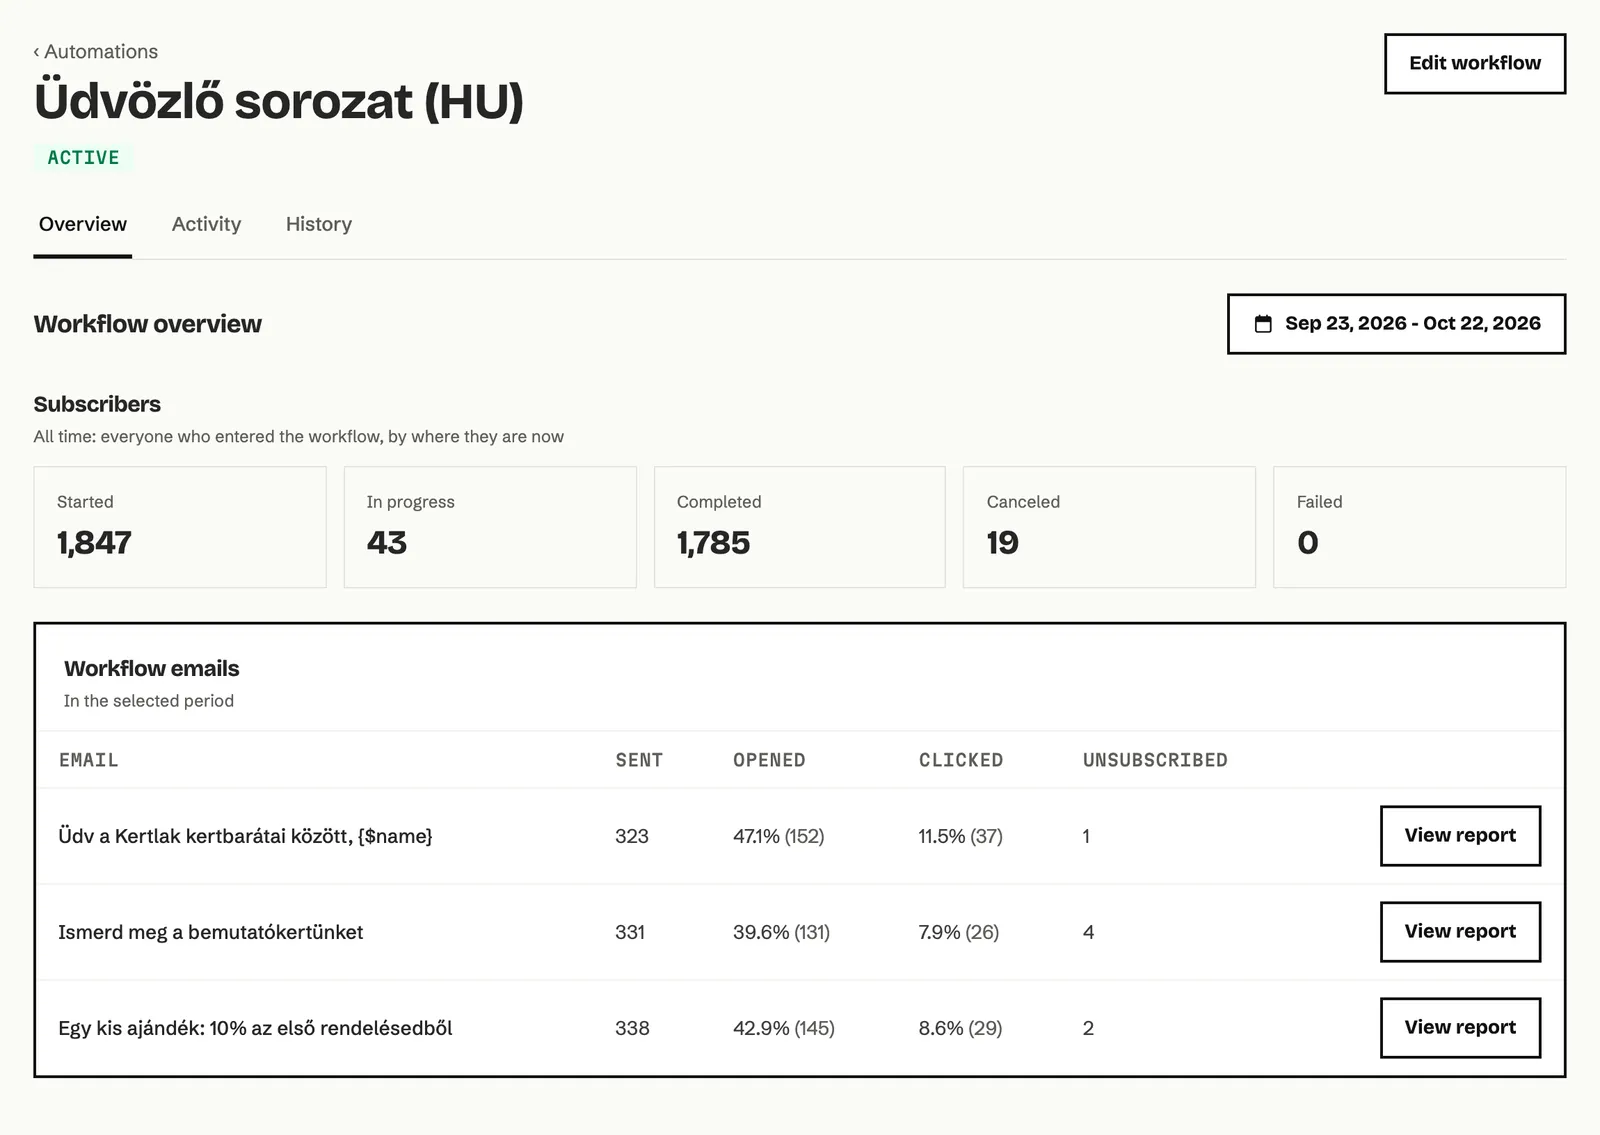
The Subscribers row shows all-time numbers: Started, In progress, Completed, Canceled and Failed. Below it, the Workflow emails table shows for each email how many were sent, how many people opened and clicked, and how many unsubscribed, in the period chosen in the top right corner. With an A/B split, a separate table shows how many subscribers took each path and which one is the winner.
Activity
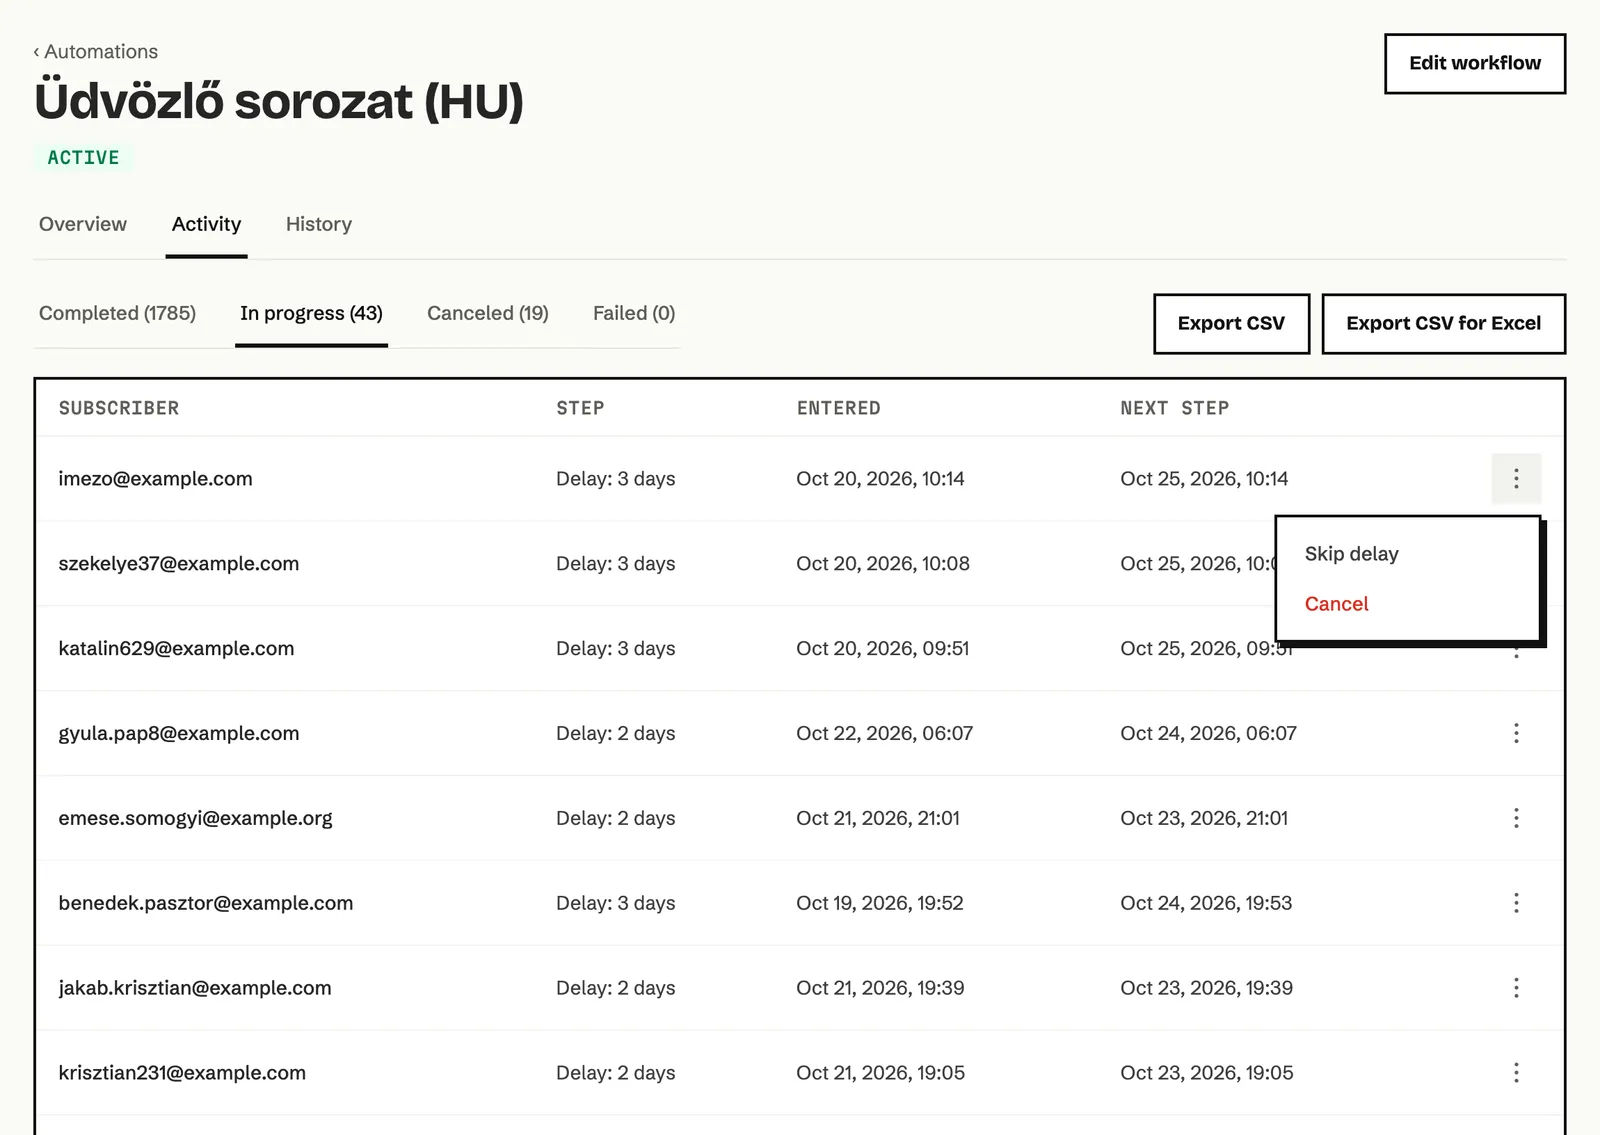
Here you see where each subscriber is. The Completed, In progress, Canceled and Failed tabs each give a list. Step shows the step they are at or were at, and Next step shows when they move on. For canceled and failed rows, Reason tells you why their path ended, for example Left the trigger groups or Joined a group the workflow excludes.
The menu at the end of a row lets you act on one subscriber:
| Action | Where | What it does |
|---|---|---|
| Skip delay | In progress, at a delay | Moves on to the next step right away. |
| Cancel | In progress | Takes the subscriber out of the workflow. |
| Continue | Canceled, Failed | Continues from where they stopped. |
| Re-add to the sequence | Completed | Goes through the workflow again from the start. |
Use Export CSV or Export CSV for Excel to download the list, if you have the export permission.
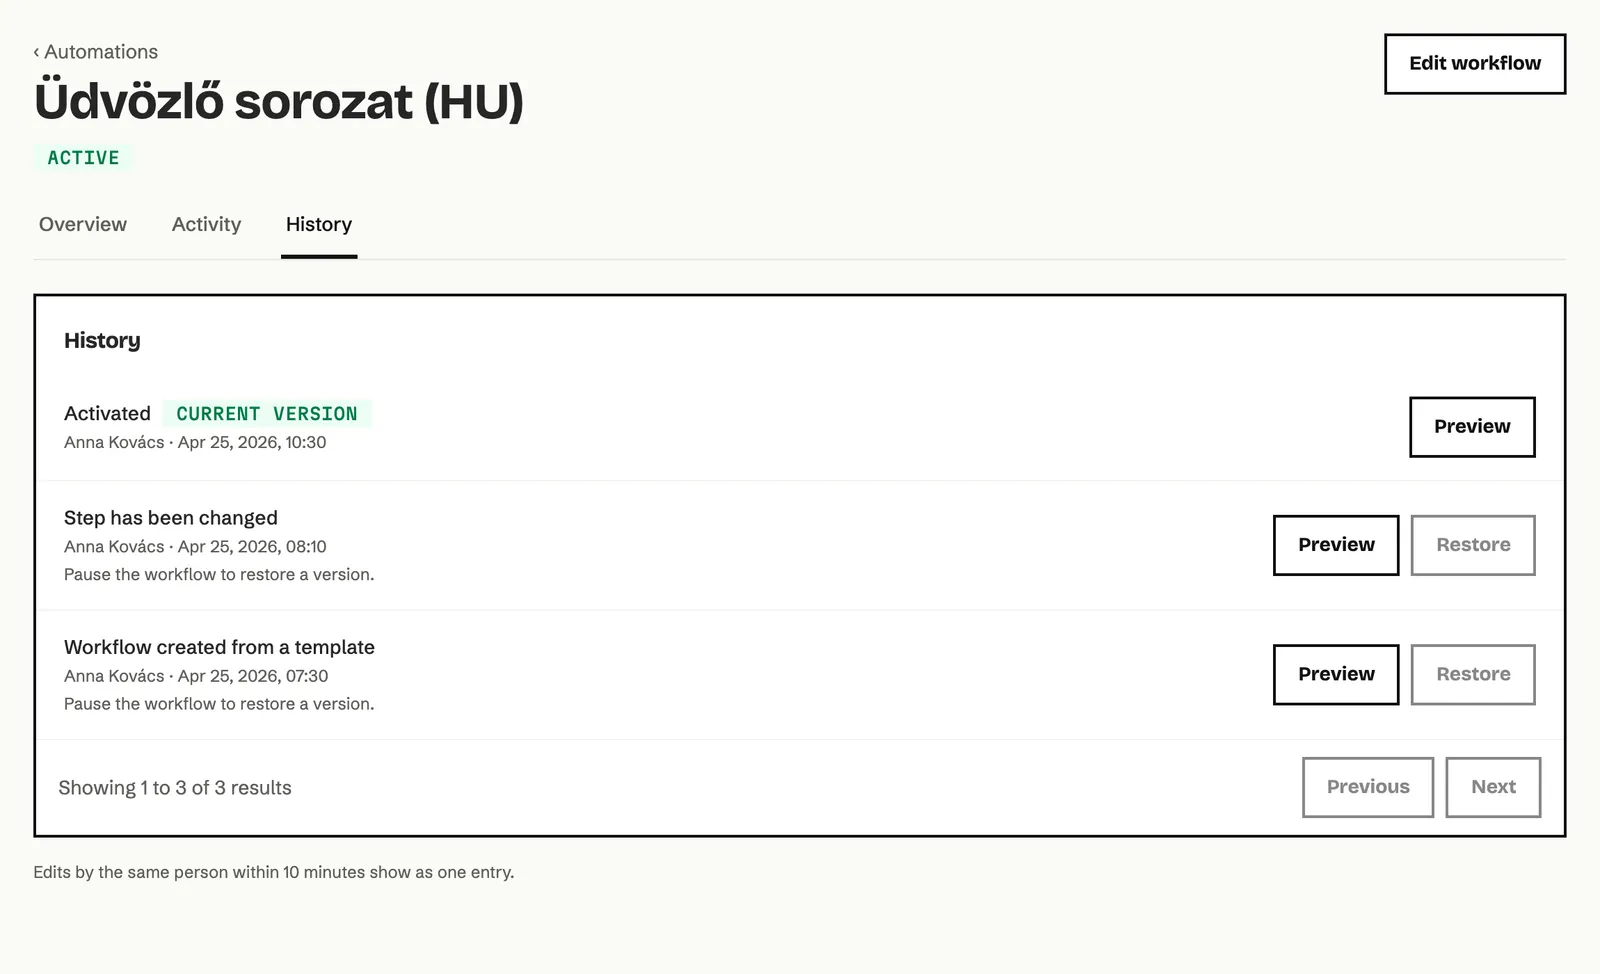
History
Every change, activation and pause shows up here, with who did it and when. The Current version label marks the entry that matches the workflow as it is now. Preview shows the workflow as it was then, and Restore takes you back to it. You can only restore a paused or draft workflow. The emails keep their current content.
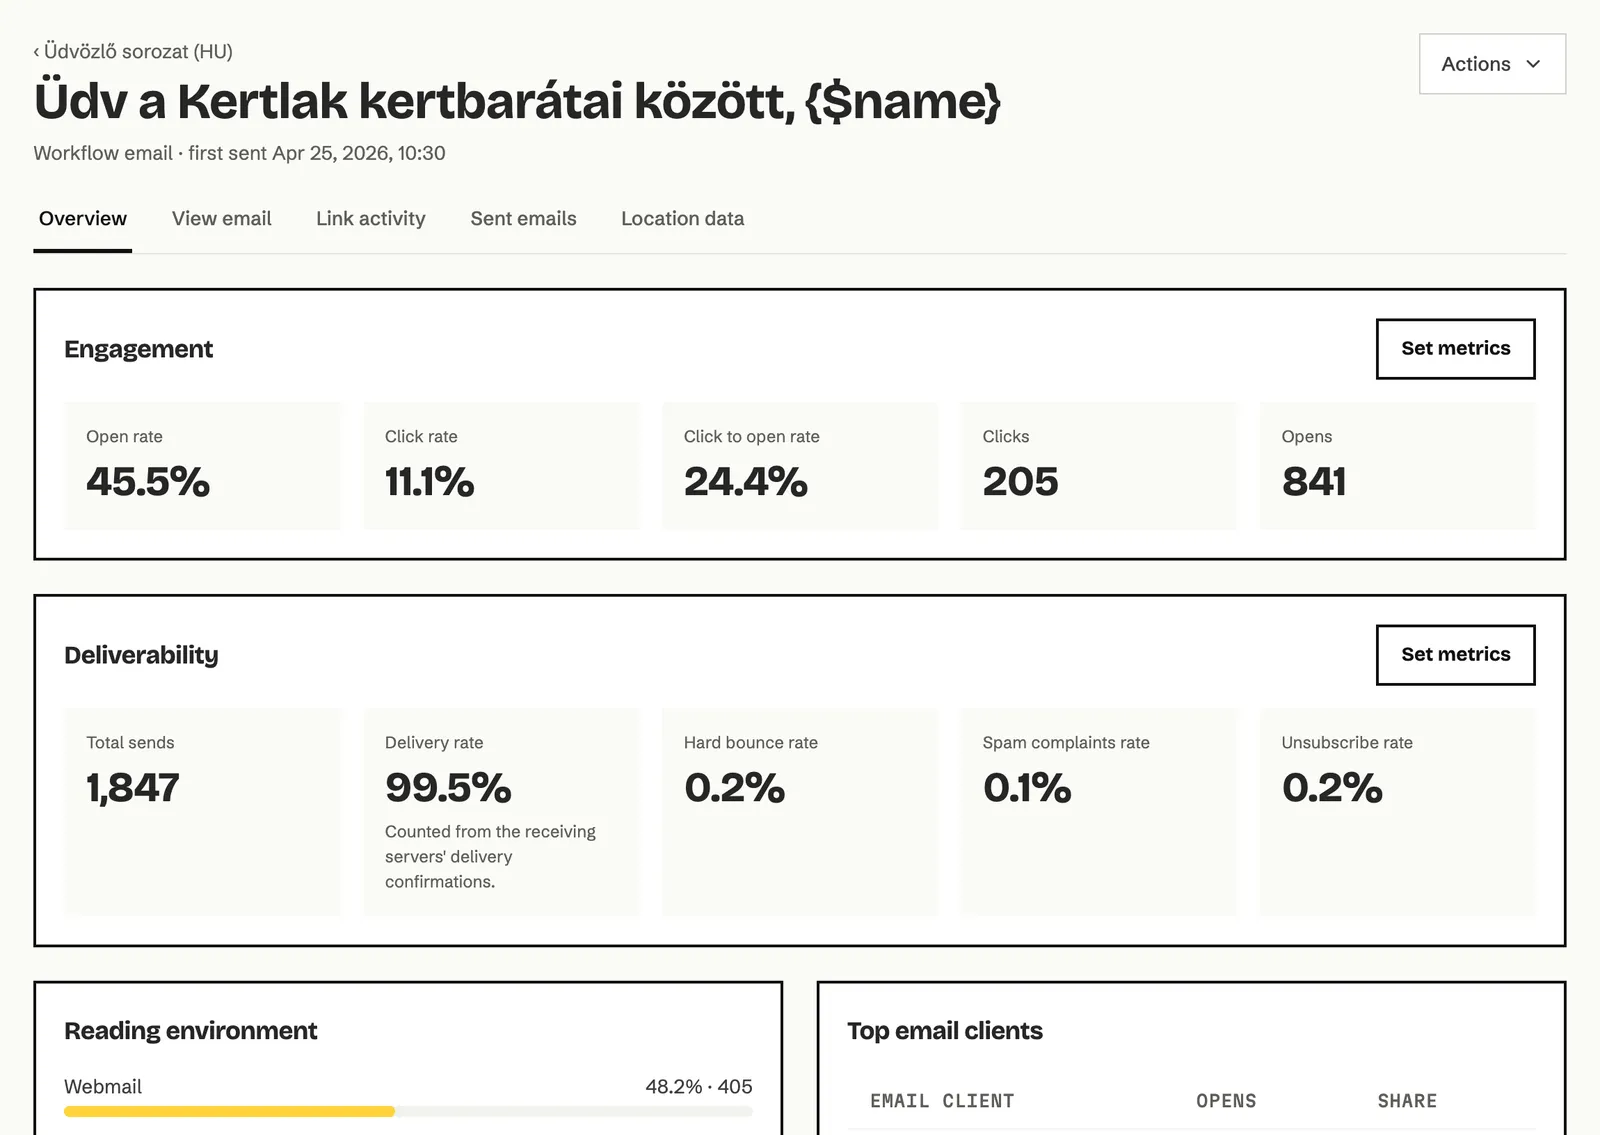
The report of one email
In the table on the Overview tab, click View report next to an email to open its own report. It works like a campaign report, with the Overview, View email, Link activity, Sent emails and Location data tabs. The Reports chapter explains them in detail.
I activated the workflow, but my existing subscribers didn’t get the first email. Why? You probably activated it with New subscribers only. Pause it, then activate it again from the canvas with one of the Existing subscribers options, or add them by hand with Add subscribers. This works only with group and segment triggers.
I made a typo in an email of an active workflow. How do I fix it? Pause the workflow, fix the email, then click Activate. People inside wait at their step during the pause and continue from there. Don’t leave it paused for more than 7 days, or their paths end.
Someone unsubscribed. Will they still get emails from the workflow? No. When someone unsubscribes or their email bounces, their path ends in every workflow. You see them in the report’s Canceled list with the reason The subscriber is no longer active.
Why is my workflow on the Drafts tab when I already activated it once? If a group, segment or field it uses was deleted, or a step needs completing, the workflow moves to Drafts. The card shows the reason, and the To complete list on the canvas shows what to fix.
Can I try it live before I start it for everyone? Yes. Test sends you every email without the delays. To see it live, activate it with New subscribers only and add yourself with Add subscribers.